经阅读11gR1 Cluster和Database安装包readme文档说明,发现11gR1 RAC安装和10gR2安装配置基本没有太大差别,大体上完全相同,没有11gR2的grid用户及集群管理方式,因此本文档简单记录一下安装及升级过程。
〇、环境描述
1.虚拟机软件
VirtualBox 4.3.26
2.操作系统版本
OEL 5.10 Linux-64
3.数据库软件
11.1.0.6 Cluster + Database
4.升级补丁包
11.1.0.7 Patch升级包 [p6890831_111070_Linux-x86-64.zip]
5.存储磁盘分配
OCR使用/dev/sdb sdc两块盘存放
Voting disk使用/dev/sdd存放
/dev/sde作为数据库盘
/dev/sdf作为闪回区盘
6.RAC集群IP地址主机名分配信息
#Public IP
192.168.56.111 11grac1
192.168.56.112 11grac2
#Private IP
10.0.10.11 11grac1-priv
10.0.10.12 11grac2-priv
#Virtual IP
192.168.56.112 11grac1-vip
192.168.56.113 11grac2-vip
一、创建虚拟机安装操作系统添加共享磁盘配置此步骤只简单说明
1.每个虚拟机至少添加两块网卡eth0/eth1

eth0作为Public网卡
eth1作为Private网卡
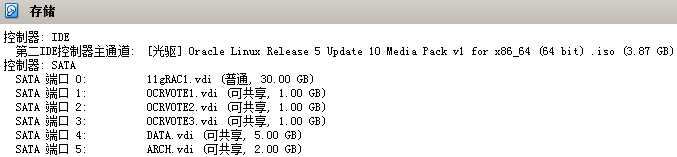
2.共享磁盘添加5块(3块1GB/1块5GB/1块2GB

1)关于5块共享磁盘说明
OCRVOTE1/2用于存放OCR
OCRVOTE3用于存放Voting Disk
DATA用于数据盘
ARCH用于闪回区
2)共享磁盘创建步骤
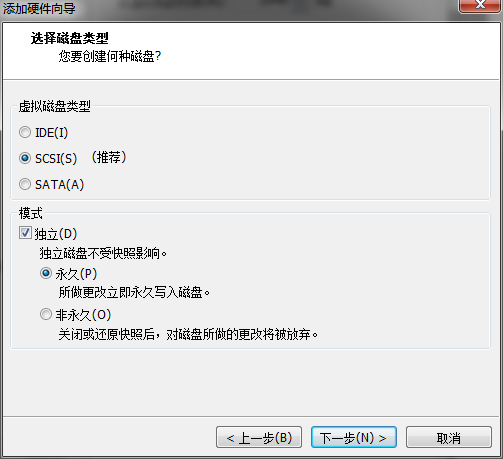
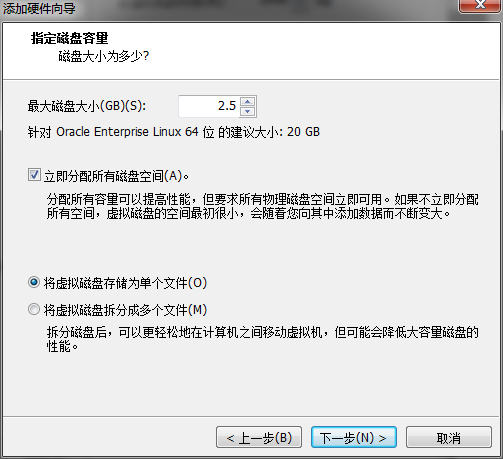
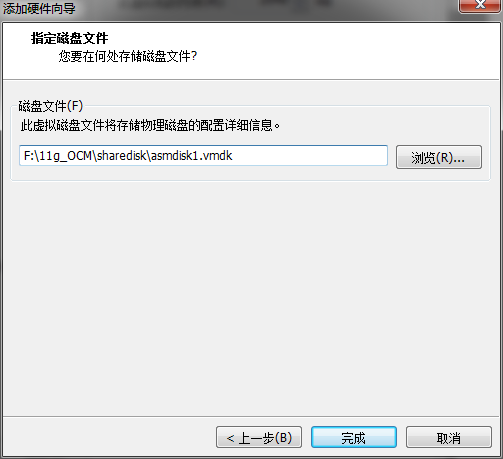
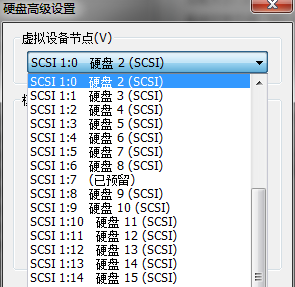
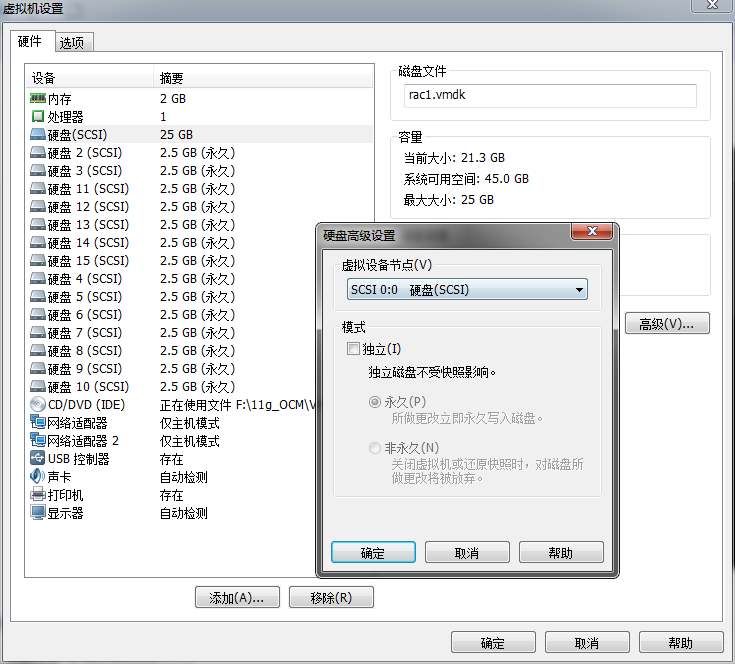
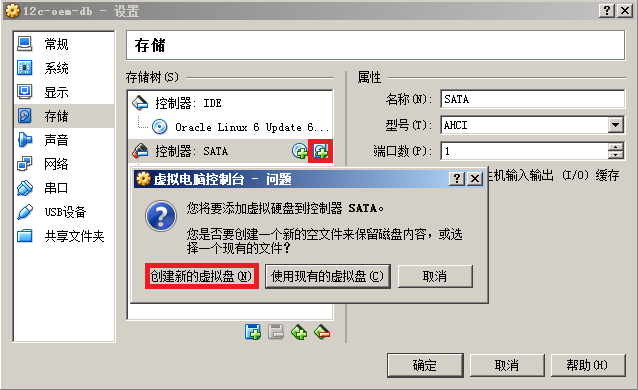
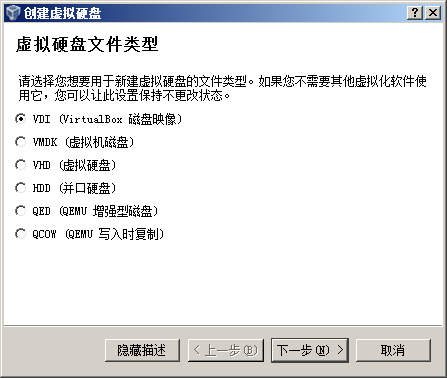
a.关闭已经安装好系统的两台虚拟机,在节点1上添加以上5块共享磁盘,点击节点1虚拟机主界面“存储”弹出如下对话框,按图示依次进行操作。
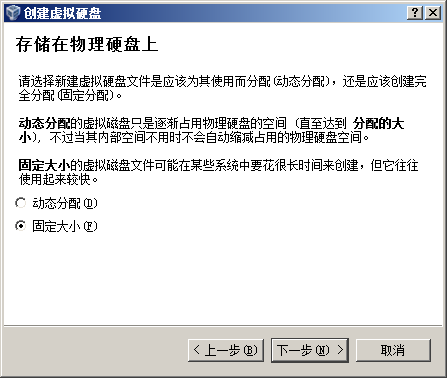
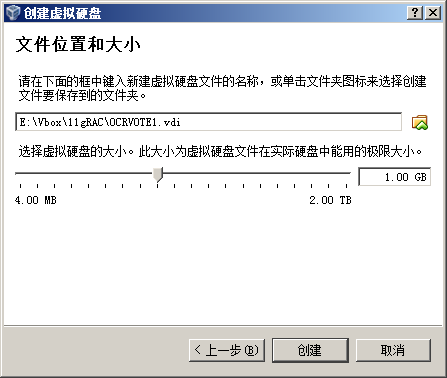
点击“创建”,按照上面的方法一次创建剩余的四块共享磁盘。
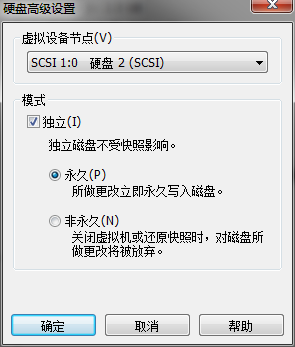
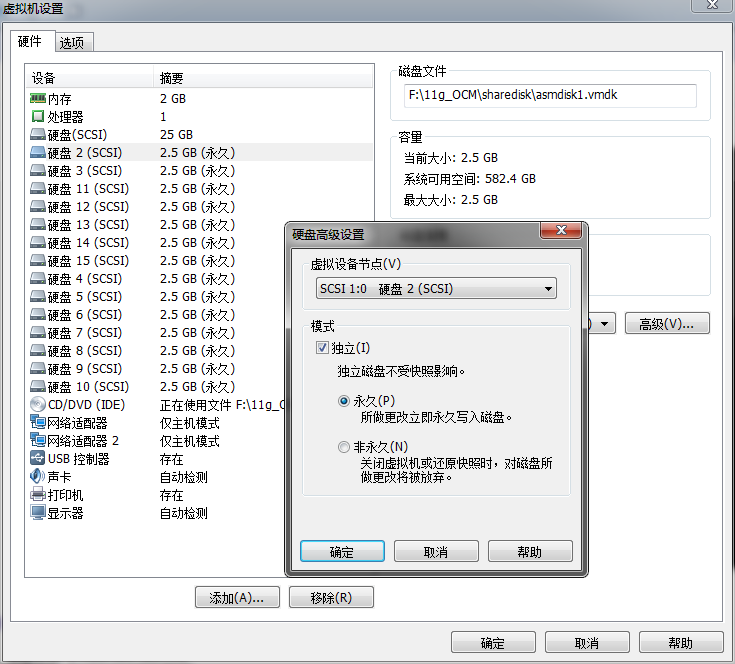
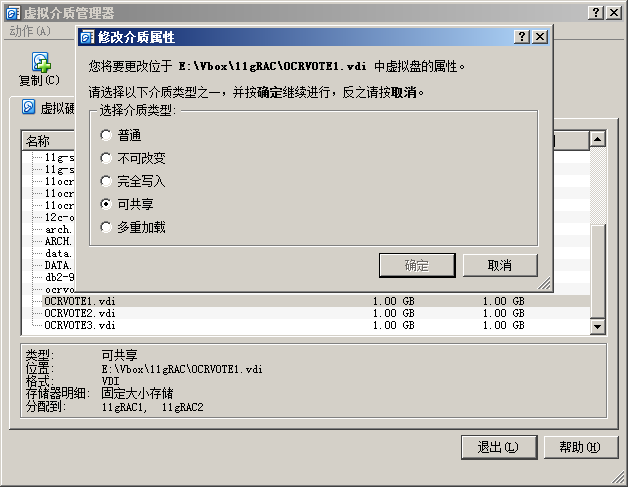
b.修改以上创建的5块磁盘属性,使其变为可共享模式。
点击VirtualBox主菜单上的“管理”—>“虚拟介质管理”,找到刚添加的5块磁盘,依次选中后,单击鼠标右键在弹出窗口中选择“可共享”后点击确定。
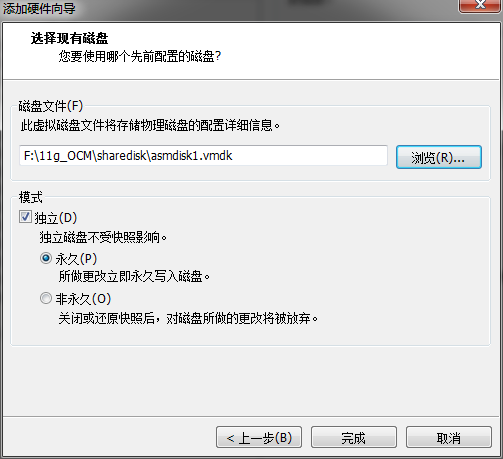
c.将5块共享磁盘依次添加到节点2虚拟机,点击节点2虚拟机主界面“存储”弹出如下对话框,按图示依次进行操作。
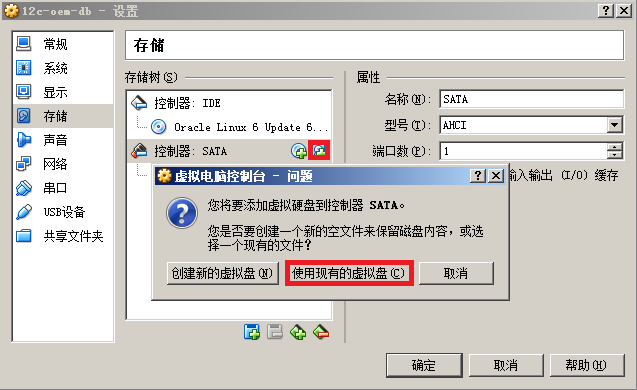
依次浏览添加在节点1上创建的5块共享磁盘,注意这里浏览添加的顺序和节点1创建磁盘时的顺序相同,完成后虚拟机节点2就可以看到和节点1相同的磁盘。
完成以上步骤启动2个节点虚拟机,完后后续步骤。
三、设置主机名IP地址hosts解析等信息此步骤忽略
[root@11grac1 ~]# cat /etc/sysconfig/network
NETWORKING=yes
NETWORKING_IPV6=no
HOSTNAME=11grac1.localdomain
NOZEROCONF=yes
[root@11grac2 ~]# cat /etc/sysconfig/network
NETWORKING=yes
NETWORKING_IPV6=no
HOSTNAME=11grac2.localdomain
NOZEROCONF=yes
[root@11grac1 ~]# ifconfig
eth0 Link encap:Ethernet HWaddr 08:00:27:5B:7E:27
inet addr:192.168.56.111 Bcast:192.168.56.255 Mask:255.255.255.0
UP BROADCAST RUNNING MULTICAST MTU:1500 Metric:1
RX packets:2333789 errors:0 dropped:0 overruns:0 frame:0
TX packets:7799133 errors:0 dropped:0 overruns:0 carrier:0
collisions:0 txqueuelen:1000
RX bytes:1044868449 (996.4 MiB) TX bytes:10558577602 (9.8 GiB)
eth1 Link encap:Ethernet HWaddr 08:00:27:20:63:C0
inet addr:10.0.10.11 Bcast:10.0.10.255 Mask:255.255.255.0
UP BROADCAST RUNNING MULTICAST MTU:1500 Metric:1
RX packets:2064610 errors:0 dropped:0 overruns:0 frame:0
TX packets:1852436 errors:0 dropped:0 overruns:0 carrier:0
collisions:0 txqueuelen:1000
RX bytes:1204869395 (1.1 GiB) TX bytes:977565503 (932.2 MiB)
lo Link encap:Local Loopback
inet addr:127.0.0.1 Mask:255.0.0.0
UP LOOPBACK RUNNING MTU:16436 Metric:1
RX packets:600944 errors:0 dropped:0 overruns:0 frame:0
TX packets:600944 errors:0 dropped:0 overruns:0 carrier:0
collisions:0 txqueuelen:0
RX bytes:412793105 (393.6 MiB) TX bytes:412793105 (393.6 MiB)
[root@11grac2 ~]# ifconfig
eth0 Link encap:Ethernet HWaddr 08:00:27:9C:07:C2
inet addr:192.168.56.222 Bcast:192.168.56.255 Mask:255.255.255.0
UP BROADCAST RUNNING MULTICAST MTU:1500 Metric:1
RX packets:7295240 errors:0 dropped:0 overruns:0 frame:0
TX packets:1149928 errors:0 dropped:0 overruns:0 carrier:0
collisions:0 txqueuelen:1000
RX bytes:10203866831 (9.5 GiB) TX bytes:86780191 (82.7 MiB)
eth1 Link encap:Ethernet HWaddr 08:00:27:CA:4E:75
inet addr:10.0.10.22 Bcast:10.0.10.255 Mask:255.255.255.0
UP BROADCAST RUNNING MULTICAST MTU:1500 Metric:1
RX packets:1381921 errors:0 dropped:0 overruns:0 frame:0
TX packets:2018678 errors:0 dropped:0 overruns:0 carrier:0
collisions:0 txqueuelen:1000
RX bytes:728991095 (695.2 MiB) TX bytes:1199900523 (1.1 GiB)
lo Link encap:Local Loopback
inet addr:127.0.0.1 Mask:255.0.0.0
UP LOOPBACK RUNNING MTU:16436 Metric:1
RX packets:447067 errors:0 dropped:0 overruns:0 frame:0
TX packets:447067 errors:0 dropped:0 overruns:0 carrier:0
collisions:0 txqueuelen:0
RX bytes:209613125 (199.9 MiB) TX bytes:209613125 (199.9 MiB)
[root@11grac1 ~]# cat /etc/hosts
# Do not remove the following line, or various programs
# that require network functionality will fail.
127.0.0.1 localhost.localdomain localhost
::1 localhost6.localdomain6 localhost6
# Public IP
192.168.56.111 11grac1.localdomain 11grac1
192.168.56.222 11grac2.localdomain 11grac2
# Private IP
10.0.10.11 11grac1-priv.localdomain 11grac1-priv
10.0.10.22 11grac2-priv.localdomain 11grac2-priv
# Virtual IP
192.168.56.112 11grac1-vip.localdomain 11grac1-vip
192.168.56.223 11grac2-vip.localdomain 11grac2-vip
[root@11grac2 ~]# cat /etc/hosts
# Do not remove the following line, or various programs
# that require network functionality will fail.
127.0.0.1 localhost.localdomain localhost
::1 localhost6.localdomain6 localhost6
# Public IP
192.168.56.111 11grac1.localdomain 11grac1
192.168.56.222 11grac2.localdomain 11grac2
# Private IP
10.0.10.11 11grac1-priv.localdomain 11grac1-priv
10.0.10.22 11grac2-priv.localdomain 11grac2-priv
# Virtual IP
192.168.56.112 11grac1-vip.localdomain 11grac1-vip
192.168.56.223 11grac2-vip.localdomain 11grac2-vip
四、安装必要补丁包
可以使用yum直接安装OEL提供的oracle-validated包,安装此包也会创建oracle用户和oinstall/dba组,可参考:http://www.lynnlee.cn/?p=225
五、RAC节点间NTP时间同步
可以参考:http://www.lynnlee.cn/?p=969
六、配置oracle用户ssh互信关系并验证
1)配置ssh互信关系
[oracle@11grac1 ~]$ ssh-keygen -t rsa
Generating public/private rsa key pair.
Enter file in which to save the key (/home/oracle/.ssh/id_rsa):
Created directory ‘/home/oracle/.ssh’.
Enter passphrase (empty for no passphrase):
Enter same passphrase again:
Your identification has been saved in /home/oracle/.ssh/id_rsa.
Your public key has been saved in /home/oracle/.ssh/id_rsa.pub.
The key fingerprint is:
10:75:22:03:21:35:c7:5b:ef:c6:3a:d9:5a:dd:6b:7b oracle@11grac1.localdomain
[oracle@11grac1 ~]$ ssh-keygen -t dsa
Generating public/private dsa key pair.
Enter file in which to save the key (/home/oracle/.ssh/id_dsa):
Enter passphrase (empty for no passphrase):
Enter same passphrase again:
Your identification has been saved in /home/oracle/.ssh/id_dsa.
Your public key has been saved in /home/oracle/.ssh/id_dsa.pub.
The key fingerprint is:
ca:19:c2:55:b7:c9:2e:30:55:96:8c:be:da:35:06:a9 oracle@11grac1.localdomain
[oracle@11grac2 ~]$ ssh-keygen -t rsa
Generating public/private rsa key pair.
Enter file in which to save the key (/home/oracle/.ssh/id_rsa):
Created directory ‘/home/oracle/.ssh’.
Enter passphrase (empty for no passphrase):
Enter same passphrase again:
Your identification has been saved in /home/oracle/.ssh/id_rsa.
Your public key has been saved in /home/oracle/.ssh/id_rsa.pub.
The key fingerprint is:
8e:4b:06:9e:7f:ce:8a:6b:d0:b8:9f:15:23:63:3b:33 oracle@11grac2.localdomain
[oracle@11grac2 ~]$ ssh-keygen -t dsa
Generating public/private dsa key pair.
Enter file in which to save the key (/home/oracle/.ssh/id_dsa):
Enter passphrase (empty for no passphrase):
Enter same passphrase again:
Your identification has been saved in /home/oracle/.ssh/id_dsa.
Your public key has been saved in /home/oracle/.ssh/id_dsa.pub.
The key fingerprint is:
a9:d2:dd:d5:91:37:30:23:81:fc:fa:c9:5f:0e:5a:96 oracle@11grac2.localdomain
[oracle@11grac1 ~]$ cat ~/.ssh/id_rsa.pub > ~/.ssh/authorized_keys
[oracle@11grac1 ~]$ cat ~/.ssh/id_dsa.pub >> ~/.ssh/authorized_keys
[oracle@11grac1 ~]$ ssh 11grac2 cat ~/.ssh/id_rsa.pub >> ~/.ssh/authorized_keys
The authenticity of host ’11grac2 (192.168.56.222)’ can’t be established.
RSA key fingerprint is 25:8c:5f:0f:cd:8a:4b:35:84:75:c8:cd:58:75:35:6b.
Are you sure you want to continue connecting (yes/no)? yes
Warning: Permanently added ’11grac2,192.168.56.222′ (RSA) to the list of known hosts.
oracle@11grac2’s password:
[oracle@11grac1 ~]$ ssh 11grac2 cat ~/.ssh/id_dsa.pub >> ~/.ssh/authorized_keys
oracle@11grac2’s password:
[oracle@11grac1 ~]$ scp ~/.ssh/authorized_keys 11grac2:~/.ssh/authorized_keys
oracle@11grac2’s password:
authorized_keys 100% 2040 2.0KB/s 00:00
2)测试oracle用户ssh互信关系
$ cat ssh.sh
ssh 11grac1 date
ssh 11grac2 date
ssh 11grac1-priv date
ssh 11grac2-priv date
[oracle@11grac1 ~]$ sh ssh.sh
Mon May 18 08:33:34 CST 2015
Mon May 18 08:33:35 CST 2015
Mon May 18 08:33:34 CST 2015
Mon May 18 08:33:35 CST 2015
[oracle@11grac2 ~]$ sh ssh.sh
Mon May 18 08:33:44 CST 2015
Mon May 18 08:33:45 CST 2015
Mon May 18 08:33:45 CST 2015
Mon May 18 08:33:46 CST 2015
七、使用udev配置ASM共享磁盘
1)查看磁盘信息
[root@11grac1.localdomain:/root]$ fdisk -l
Disk /dev/sdb: 1073 MB, 1073741824 bytes
255 heads, 63 sectors/track, 130 cylinders
Units = cylinders of 16065 * 512 = 8225280 bytes
Disk /dev/sdb doesn’t contain a valid partition table
Disk /dev/sdc: 1073 MB, 1073741824 bytes
255 heads, 63 sectors/track, 130 cylinders
Units = cylinders of 16065 * 512 = 8225280 bytes
Disk /dev/sdc doesn’t contain a valid partition table
Disk /dev/sdd: 1073 MB, 1073741824 bytes
255 heads, 63 sectors/track, 130 cylinders
Units = cylinders of 16065 * 512 = 8225280 bytes
Disk /dev/sdd doesn’t contain a valid partition table
Disk /dev/sde: 5368 MB, 5368709120 bytes
255 heads, 63 sectors/track, 652 cylinders
Units = cylinders of 16065 * 512 = 8225280 bytes
Disk /dev/sde doesn’t contain a valid partition table
Disk /dev/sdf: 2147 MB, 2147483648 bytes
255 heads, 63 sectors/track, 261 cylinders
Units = cylinders of 16065 * 512 = 8225280 bytes
Disk /dev/sdf doesn’t contain a valid partition table
[root@11grac2.localdomain:/root]$ fdisk -l
Disk /dev/sdb: 1073 MB, 1073741824 bytes
255 heads, 63 sectors/track, 130 cylinders
Units = cylinders of 16065 * 512 = 8225280 bytes
Disk /dev/sdb doesn’t contain a valid partition table
Disk /dev/sdc: 1073 MB, 1073741824 bytes
255 heads, 63 sectors/track, 130 cylinders
Units = cylinders of 16065 * 512 = 8225280 bytes
Disk /dev/sdc doesn’t contain a valid partition table
Disk /dev/sdd: 1073 MB, 1073741824 bytes
255 heads, 63 sectors/track, 130 cylinders
Units = cylinders of 16065 * 512 = 8225280 bytes
Disk /dev/sdd doesn’t contain a valid partition table
Disk /dev/sde: 5368 MB, 5368709120 bytes
255 heads, 63 sectors/track, 652 cylinders
Units = cylinders of 16065 * 512 = 8225280 bytes
Disk /dev/sde doesn’t contain a valid partition table
Disk /dev/sdf: 2147 MB, 2147483648 bytes
255 heads, 63 sectors/track, 261 cylinders
Units = cylinders of 16065 * 512 = 8225280 bytes
Disk /dev/sdf doesn’t contain a valid partition table
2)使用udev配置共享磁盘
在两个节点上执行以下令,并将输出结果添加到新建的udev规则文件/etc/udev/rules.d/99-oracle-asmdevices.rules中:
for i in b c d e f;
do
echo “KERNEL==\”sd*\”, BUS==\”scsi\”, PROGRAM==\”/sbin/scsi_id -g -u -s %p\”, RESULT==\”`scsi_id -g -u -s /block/sd$i`\”, NAME=\”asm-disk$i\”, OWNER=\”oracle\”, GROUP=\”oinstall\”, MODE=\”0660\””
done
[root@11grac1 ~]# for i in b c d e f;
> do
> echo “KERNEL==\”sd*\”, BUS==\”scsi\”, PROGRAM==\”/sbin/scsi_id -g -u -s %p\”, RESULT==\”`scsi_id -g -u -s /block/sd$i`\”, NAME=\”asm-disk$i\”, OWNER=\”oracle\”, GROUP=\”oinstall\”, MODE=\”0660\””
> done
KERNEL==”sd*”, BUS==”scsi”, PROGRAM==”/sbin/scsi_id -g -u -s %p”, RESULT==”SATA_VBOX_HARDDISK_VB424a5eb7-c9274de0_”, NAME=”asm-diskb”, OWNER=”oracle”, GROUP=”oinstall”, MODE=”0660″
KERNEL==”sd*”, BUS==”scsi”, PROGRAM==”/sbin/scsi_id -g -u -s %p”, RESULT==”SATA_VBOX_HARDDISK_VB95c63929-9336a092_”, NAME=”asm-diskc”, OWNER=”oracle”, GROUP=”oinstall”, MODE=”0660″
KERNEL==”sd*”, BUS==”scsi”, PROGRAM==”/sbin/scsi_id -g -u -s %p”, RESULT==”SATA_VBOX_HARDDISK_VBa044f79d-51b67554_”, NAME=”asm-diskd”, OWNER=”oracle”, GROUP=”oinstall”, MODE=”0660″
KERNEL==”sd*”, BUS==”scsi”, PROGRAM==”/sbin/scsi_id -g -u -s %p”, RESULT==”SATA_VBOX_HARDDISK_VB86ee407e-415b5b32_”, NAME=”asm-diske”, OWNER=”oracle”, GROUP=”oinstall”, MODE=”0660″
KERNEL==”sd*”, BUS==”scsi”, PROGRAM==”/sbin/scsi_id -g -u -s %p”, RESULT==”SATA_VBOX_HARDDISK_VBe59f5561-e0df75b7_”, NAME=”asm-diskf”, OWNER=”oracle”, GROUP=”oinstall”, MODE=”0660″
[root@11grac2 ~]# for i in b c d e f;
> do
> echo “KERNEL==\”sd*\”, BUS==\”scsi\”, PROGRAM==\”/sbin/scsi_id -g -u -s %p\”, RESULT==\”`scsi_id -g -u -s /block/sd$i`\”, NAME=\”asm-disk$i\”, OWNER=\”oracle\”, GROUP=\”oinstall\”, MODE=\”0660\””
> done
KERNEL==”sd*”, BUS==”scsi”, PROGRAM==”/sbin/scsi_id -g -u -s %p”, RESULT==”SATA_VBOX_HARDDISK_VB424a5eb7-c9274de0_”, NAME=”asm-diskb”, OWNER=”oracle”, GROUP=”oinstall”, MODE=”0660″
KERNEL==”sd*”, BUS==”scsi”, PROGRAM==”/sbin/scsi_id -g -u -s %p”, RESULT==”SATA_VBOX_HARDDISK_VB95c63929-9336a092_”, NAME=”asm-diskc”, OWNER=”oracle”, GROUP=”oinstall”, MODE=”0660″
KERNEL==”sd*”, BUS==”scsi”, PROGRAM==”/sbin/scsi_id -g -u -s %p”, RESULT==”SATA_VBOX_HARDDISK_VBa044f79d-51b67554_”, NAME=”asm-diskd”, OWNER=”oracle”, GROUP=”oinstall”, MODE=”0660″
KERNEL==”sd*”, BUS==”scsi”, PROGRAM==”/sbin/scsi_id -g -u -s %p”, RESULT==”SATA_VBOX_HARDDISK_VB86ee407e-415b5b32_”, NAME=”asm-diske”, OWNER=”oracle”, GROUP=”oinstall”, MODE=”0660″
KERNEL==”sd*”, BUS==”scsi”, PROGRAM==”/sbin/scsi_id -g -u -s %p”, RESULT==”SATA_VBOX_HARDDISK_VBe59f5561-e0df75b7_”, NAME=”asm-diskf”, OWNER=”oracle”, GROUP=”oinstall”, MODE=”0660″
[root@11grac1 ~]# cat /etc/udev/rules.d/99-oracle-asmdevices.rules
KERNEL==”sd*”, BUS==”scsi”, PROGRAM==”/sbin/scsi_id -g -u -s %p”, RESULT==”SATA_VBOX_HARDDISK_VB424a5eb7-c9274de0_”, NAME=”asm-diskb”, OWNER=”oracle”, GROUP=”oinstall”, MODE=”0660″
KERNEL==”sd*”, BUS==”scsi”, PROGRAM==”/sbin/scsi_id -g -u -s %p”, RESULT==”SATA_VBOX_HARDDISK_VB95c63929-9336a092_”, NAME=”asm-diskc”, OWNER=”oracle”, GROUP=”oinstall”, MODE=”0660″
KERNEL==”sd*”, BUS==”scsi”, PROGRAM==”/sbin/scsi_id -g -u -s %p”, RESULT==”SATA_VBOX_HARDDISK_VBa044f79d-51b67554_”, NAME=”asm-diskd”, OWNER=”oracle”, GROUP=”oinstall”, MODE=”00660″
KERNEL==”sd*”, BUS==”scsi”, PROGRAM==”/sbin/scsi_id -g -u -s %p”, RESULT==”SATA_VBOX_HARDDISK_VB86ee407e-415b5b32_”, NAME=”asm-diske”, OWNER=”oracle”, GROUP=”oinstall”, MODE=”0660″
KERNEL==”sd*”, BUS==”scsi”, PROGRAM==”/sbin/scsi_id -g -u -s %p”, RESULT==”SATA_VBOX_HARDDISK_VBe59f5561-e0df75b7_”, NAME=”asm-diskf”, OWNER=”oracle”, GROUP=”oinstall”, MODE=”0660″
[root@11grac2 ~]# cat /etc/udev/rules.d/99-oracle-asmdevices.rules
KERNEL==”sd*”, BUS==”scsi”, PROGRAM==”/sbin/scsi_id -g -u -s %p”, RESULT==”SATA_VBOX_HARDDISK_VB424a5eb7-c9274de0_”, NAME=”asm-diskb”, OWNER=”oracle”, GROUP=”oinstall”, MODE=”0660″
KERNEL==”sd*”, BUS==”scsi”, PROGRAM==”/sbin/scsi_id -g -u -s %p”, RESULT==”SATA_VBOX_HARDDISK_VB95c63929-9336a092_”, NAME=”asm-diskc”, OWNER=”oracle”, GROUP=”oinstall”, MODE=”0660″
KERNEL==”sd*”, BUS==”scsi”, PROGRAM==”/sbin/scsi_id -g -u -s %p”, RESULT==”SATA_VBOX_HARDDISK_VBa044f79d-51b67554_”, NAME=”asm-diskd”, OWNER=”oracle”, GROUP=”oinstall”, MODE=”0660″
KERNEL==”sd*”, BUS==”scsi”, PROGRAM==”/sbin/scsi_id -g -u -s %p”, RESULT==”SATA_VBOX_HARDDISK_VB86ee407e-415b5b32_”, NAME=”asm-diske”, OWNER=”oracle”, GROUP=”oinstall”, MODE=”0660″
KERNEL==”sd*”, BUS==”scsi”, PROGRAM==”/sbin/scsi_id -g -u -s %p”, RESULT==”SATA_VBOX_HARDDISK_VBe59f5561-e0df75b7_”, NAME=”asm-diskf”, OWNER=”oracle”, GROUP=”oinstall”, MODE=”0660″
3)启动udev
[root@11grac1 ~]# start_udev
Starting udev: [ OK ]
[root@11grac2 ~]# start_udev
Starting udev: [ OK ]
4)查看共享磁盘
[root@11grac1 ~]# ls -l /dev/asm-disk*
brw-rw—- 1 oracle oinstall 8, 16 May 18 2015 /dev/asm-diskb
brw-rw—- 1 oracle oinstall 8, 32 May 18 2015 /dev/asm-diskc
brw-rw—- 1 oracle oinstall 8, 48 May 18 08:16 /dev/asm-diskd
brw-rw—- 1 oracle oinstall 8, 64 May 18 08:15 /dev/asm-diske
brw-rw—- 1 oracle oinstall 8, 80 May 18 08:15 /dev/asm-diskf
[root@11grac2 ~]#ls -l /dev/asm-disk*
brw-rw—- 1 oracle oinstall 8, 16 May 18 08:16 /dev/asm-diskb
brw-rw—- 1 oracle oinstall 8, 32 May 18 08:16 /dev/asm-diskc
brw-rw—- 1 oracle oinstall 8, 48 May 18 08:17 /dev/asm-diskd
brw-rw—- 1 oracle oinstall 8, 64 May 18 08:15 /dev/asm-diske
brw-rw—- 1 oracle oinstall 8, 80 May 18 08:15 /dev/asm-diskf
八、设置环境变量
1)oracle环境变量
[oracle@11grac1 ~]$ cat .bash_profile
# .bash_profile
# Get the aliases and functions
if [ -f ~/.bashrc ]; then
. ~/.bashrc
fi
# User specific environment and startup programs
PATH=$PATH:$HOME/bin
export PATH
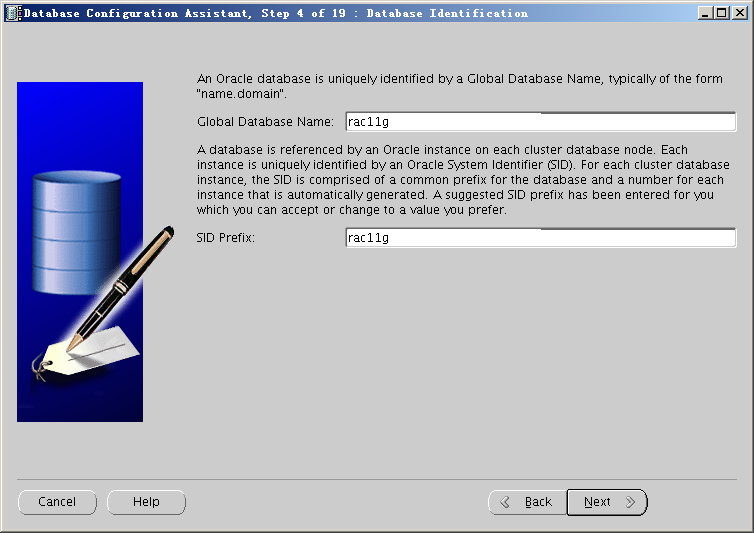
export ORACLE_UNQNAME=rac11g
export ORACLE_SID=rac11g1
export ORACLE_BASE=/u01/app
export CRS_HOME=$ORACLE_BASE/crs/11.1.0/crshome_1
export ORACLE_HOME=$ORACLE_BASE/oracle/product/11.1.0/dbhome_1
export LD_LIBRARY_PATH=$ORACLE_HOME/lib:/lib:/usr/lib:/usr/share/lib
export CLASSPATH=$ORACLE_HOME/jre:$ORACLE_HOME/jlib:$ORACLE_HOME/jdbc/lib:$ORACLE_HOME/rdbms/jlib:$ORACLE_HOME/network/jlib
export PATH=$ORACLE_HOME/bin:$CRS_HOME/bin:$PATH
[oracle@11grac2 ~]$ cat .bash_profile
# .bash_profile
# Get the aliases and functions
if [ -f ~/.bashrc ]; then
. ~/.bashrc
fi
# User specific environment and startup programs
PATH=$PATH:$HOME/bin
export PATH
export ORACLE_UNQNAME=rac11g
export ORACLE_SID=rac11g1
export ORACLE_BASE=/u01/app
export CRS_HOME=$ORACLE_BASE/crs/11.1.0/crshome_1
export ORACLE_HOME=$ORACLE_BASE/oracle/product/11.1.0/dbhome_1
export LD_LIBRARY_PATH=$ORACLE_HOME/lib:/lib:/usr/lib:/usr/share/lib
export CLASSPATH=$ORACLE_HOME/jre:$ORACLE_HOME/jlib:$ORACLE_HOME/jdbc/lib:$ORACLE_HOME/rdbms/jlib:$ORACLE_HOME/network/jlib
export PATH=$ORACLE_HOME/bin:$CRS_HOME/bin:$PATH
2)root环境变量
[root@11grac1 ~]# cat .bash_profile
# .bash_profile
# Get the aliases and functions
if [ -f ~/.bashrc ]; then
. ~/.bashrc
fi
# User specific environment and startup programs
PATH=$PATH:$HOME/bin
export PATH
unset USERNAME
export ORACLE_BASE=/u01/app
export CRS_HOME=$ORACLE_BASE/crs/11.1.0/crshome_1
export PATH=$CRS_HOME/bin:$PATH
[root@11grac2 ~]# cat .bash_profile
# .bash_profile
# Get the aliases and functions
if [ -f ~/.bashrc ]; then
. ~/.bashrc
fi
# User specific environment and startup programs
PATH=$PATH:$HOME/bin
export PATH
unset USERNAME
export ORACLE_BASE=/u01/app
export CRS_HOME=$ORACLE_BASE/crs/11.1.0/crshome_1
export PATH=$CRS_HOME/bin:$PATH
九、创建用户属主目录修改权限此步骤忽略
十、安装11.1.0.6 Cluster软件
1)安装前预检查
[root@11grac1.localdomain:/tmp]$ unzip linux.x64_11gR1_clusterware.zip
[root@11grac1.localdomain:/tmp]$ cd clusterware
[oracle@11grac1.localdomain:/tmp/clusterware]$ ./runcluvfy.sh stage -pre crsinst -n 11grac1,11grac2 -verbose
Performing pre-checks for cluster services setup
Checking node reachability…
Check: Node reachability from node “11grac1″
Destination Node Reachable?
———————————— ————————
11grac2 yes
11grac1 yes
Result: Node reachability check passed from node “11grac1″.
Checking user equivalence…
Check: User equivalence for user “oracle”
Node Name Comment
———————————— ————————
11grac2 passed
11grac1 passed
Result: User equivalence check passed for user “oracle”.
Checking administrative privileges…
Check: Existence of user “oracle”
Node Name User Exists Comment
———— ———————— ————————
11grac2 yes passed
11grac1 yes passed
Result: User existence check passed for “oracle”.
Check: Existence of group “oinstall”
Node Name Status Group ID
———— ———————— ————————
11grac2 exists 54321
11grac1 exists 54321
Result: Group existence check passed for “oinstall”.
Check: Membership of user “oracle” in group “oinstall” [as Primary]
Node Name User Exists Group Exists User in Group Primary Comment
—————- ———— ———— ———— ———— ————
11grac2 yes yes yes yes passed
11grac1 yes yes yes yes passed
Result: Membership check for user “oracle” in group “oinstall” [as Primary] passed.
Administrative privileges check passed.
Checking node connectivity…
Interface information for node “11grac2″
Interface Name IP Address Subnet Subnet Gateway Default Gateway Hardware Address
—————- ———— ———— ———— ———— ————
eth0 192.168.56.222 192.168.56.0 0.0.0.0 10.0.10.1 08:00:27:9C:07:C2
eth1 10.0.10.22 10.0.10.0 0.0.0.0 10.0.10.1 08:00:27:CA:4E:75
Interface information for node “11grac1″
Interface Name IP Address Subnet Subnet Gateway Default Gateway Hardware Address
—————- ———— ———— ———— ———— ————
eth0 192.168.56.111 192.168.56.0 0.0.0.0 10.0.10.1 08:00:27:5B:7E:27
eth1 10.0.10.11 10.0.10.0 0.0.0.0 10.0.10.1 08:00:27:20:63:C0
Check: Node connectivity of subnet “192.168.56.0”
Source Destination Connected?
—————————— —————————— —————-
11grac2:eth0 11grac1:eth0 yes
Result: Node connectivity check passed for subnet “192.168.56.0” with node(s) 11grac2,11grac1.
Check: Node connectivity of subnet “10.0.10.0”
Source Destination Connected?
—————————— —————————— —————-
11grac2:eth1 11grac1:eth1 yes
Result: Node connectivity check passed for subnet “10.0.10.0” with node(s) 11grac2,11grac1.
Interfaces found on subnet “192.168.56.0” that are likely candidates for VIP:
11grac2 eth0:192.168.56.222
11grac1 eth0:192.168.56.111
Interfaces found on subnet “10.0.10.0” that are likely candidates for a private interconnect:
11grac2 eth1:10.0.10.22
11grac1 eth1:10.0.10.11
Result: Node connectivity check passed.
Checking system requirements for ‘crs’…
Check: Total memory
Node Name Available Required Comment
———— ———————— ———————— ———-
11grac2 1.96GB (2054984KB) 1GB (1048576KB) passed
11grac1 1.96GB (2054984KB) 1GB (1048576KB) passed
Result: Total memory check passed.
Check: Free disk space in “/tmp” dir
Node Name Available Required Comment
———— ———————— ———————— ———-
11grac2 21.1GB (22124120KB) 400MB (409600KB) passed
11grac1 18.44GB (19332556KB) 400MB (409600KB) passed
Result: Free disk space check passed.
Check: Swap space
Node Name Available Required Comment
———— ———————— ———————— ———-
11grac2 4GB (4194300KB) 1.5GB (1572864KB) passed
11grac1 4GB (4194300KB) 1.5GB (1572864KB) passed
Result: Swap space check passed.
Check: System architecture
Node Name Available Required Comment
———— ———————— ———————— ———-
11grac2 x86_64 x86_64 passed
11grac1 x86_64 x86_64 passed
Result: System architecture check passed.
Check: Kernel version
Node Name Available Required Comment
———— ———————— ———————— ———-
11grac2 2.6.39-400.209.1.el5uek 2.6.18 passed
11grac1 2.6.39-400.209.1.el5uek 2.6.18 passed
Result: Kernel version check passed.
Check: Package existence for “make-3.81″
Node Name Status Comment
—————————— —————————— —————-
11grac2 make-3.81-3.el5 passed
11grac1 make-3.81-3.el5 passed
Result: Package existence check passed for “make-3.81″.
Check: Package existence for “binutils-2.17.50.0.6″
Node Name Status Comment
—————————— —————————— —————-
11grac2 binutils-2.17.50.0.6-26.el5 passed
11grac1 binutils-2.17.50.0.6-26.el5 passed
Result: Package existence check passed for “binutils-2.17.50.0.6″.
Check: Package existence for “gcc-4.1.1″
Node Name Status Comment
—————————— —————————— —————-
11grac2 gcc-4.1.2-54.el5 passed
11grac1 gcc-4.1.2-54.el5 passed
Result: Package existence check passed for “gcc-4.1.1″.
Check: Package existence for “libaio-0.3.106″
Node Name Status Comment
—————————— —————————— —————-
11grac2 libaio-0.3.106-5 passed
11grac1 libaio-0.3.106-5 passed
Result: Package existence check passed for “libaio-0.3.106″.
Check: Package existence for “libaio-0.3.106″
Node Name Status Comment
—————————— —————————— —————-
11grac2 libaio-0.3.106-5 passed
11grac1 libaio-0.3.106-5 passed
Result: Package existence check passed for “libaio-0.3.106″.
Check: Package existence for “libaio-devel-0.3.106″
Node Name Status Comment
—————————— —————————— —————-
11grac2 libaio-devel-0.3.106-5 passed
11grac1 libaio-devel-0.3.106-5 passed
Result: Package existence check passed for “libaio-devel-0.3.106″.
Check: Package existence for “libstdc++-4.1.1″
Node Name Status Comment
—————————— —————————— —————-
11grac2 libstdc++-4.1.2-54.el5 passed
11grac1 libstdc++-4.1.2-54.el5 passed
Result: Package existence check passed for “libstdc++-4.1.1″.
Check: Package existence for “libstdc++-4.1.1″
Node Name Status Comment
—————————— —————————— —————-
11grac2 libstdc++-4.1.2-54.el5 passed
11grac1 libstdc++-4.1.2-54.el5 passed
Result: Package existence check passed for “libstdc++-4.1.1″.
Check: Package existence for “elfutils-libelf-devel-0.125″
Node Name Status Comment
—————————— —————————— —————-
11grac2 elfutils-libelf-devel-0.137-3.el5 passed
11grac1 elfutils-libelf-devel-0.137-3.el5 passed
Result: Package existence check passed for “elfutils-libelf-devel-0.125″.
Check: Package existence for “sysstat-7.0.0″
Node Name Status Comment
—————————— —————————— —————-
11grac2 sysstat-7.0.2-12.0.1.el5 passed
11grac1 sysstat-7.0.2-12.0.1.el5 passed
Result: Package existence check passed for “sysstat-7.0.0″.
Check: Package existence for “compat-libstdc++-33-3.2.3″
Node Name Status Comment
—————————— —————————— —————-
11grac2 compat-libstdc++-33-3.2.3-61 passed
11grac1 compat-libstdc++-33-3.2.3-61 passed
Result: Package existence check passed for “compat-libstdc++-33-3.2.3″.
Check: Package existence for “compat-libstdc++-33-3.2.3″
Node Name Status Comment
—————————— —————————— —————-
11grac2 compat-libstdc++-33-3.2.3-61 passed
11grac1 compat-libstdc++-33-3.2.3-61 passed
Result: Package existence check passed for “compat-libstdc++-33-3.2.3″.
Check: Package existence for “libgcc-4.1.1″
Node Name Status Comment
—————————— —————————— —————-
11grac2 libgcc-4.1.2-54.el5 passed
11grac1 libgcc-4.1.2-54.el5 passed
Result: Package existence check passed for “libgcc-4.1.1″.
Check: Package existence for “libgcc-4.1.1″
Node Name Status Comment
—————————— —————————— —————-
11grac2 libgcc-4.1.2-54.el5 passed
11grac1 libgcc-4.1.2-54.el5 passed
Result: Package existence check passed for “libgcc-4.1.1″.
Check: Package existence for “libstdc++-devel-4.1.1″
Node Name Status Comment
—————————— —————————— —————-
11grac2 libstdc++-devel-4.1.2-54.el5 passed
11grac1 libstdc++-devel-4.1.2-54.el5 passed
Result: Package existence check passed for “libstdc++-devel-4.1.1″.
Check: Package existence for “elfutils-libelf-0.125″
Node Name Status Comment
—————————— —————————— —————-
11grac2 elfutils-libelf-0.137-3.el5 passed
11grac1 elfutils-libelf-0.137-3.el5 passed
Result: Package existence check passed for “elfutils-libelf-0.125″.
Check: Package existence for “glibc-2.5-12″
Node Name Status Comment
—————————— —————————— —————-
11grac2 missing failed
11grac1 missing failed
Result: Package existence check failed for “glibc-2.5-12″.
Check: Package existence for “glibc-2.5-12″
Node Name Status Comment
—————————— —————————— —————-
11grac2 glibc-2.5-118 passed
11grac1 glibc-2.5-118 passed
Result: Package existence check passed for “glibc-2.5-12″.
Check: Package existence for “glibc-common-2.5″
Node Name Status Comment
—————————— —————————— —————-
11grac2 glibc-common-2.5-118 passed
11grac1 glibc-common-2.5-118 passed
Result: Package existence check passed for “glibc-common-2.5″.
Check: Package existence for “glibc-devel-2.5″
Node Name Status Comment
—————————— —————————— —————-
11grac2 glibc-devel-2.5-118 passed
11grac1 glibc-devel-2.5-118 passed
Result: Package existence check passed for “glibc-devel-2.5″.
Check: Package existence for “glibc-devel-2.5″
Node Name Status Comment
—————————— —————————— —————-
11grac2 glibc-devel-2.5-118 passed
11grac1 glibc-devel-2.5-118 passed
Result: Package existence check passed for “glibc-devel-2.5″.
Check: Package existence for “gcc-c++-4.1.1″
Node Name Status Comment
—————————— —————————— —————-
11grac2 gcc-c++-4.1.2-54.el5 passed
11grac1 gcc-c++-4.1.2-54.el5 passed
Result: Package existence check passed for “gcc-c++-4.1.1″.
Check: Group existence for “dba”
Node Name Status Comment
———— ———————— ————————
11grac2 exists passed
11grac1 exists passed
Result: Group existence check passed for “dba”.
Check: Group existence for “oinstall”
Node Name Status Comment
———— ———————— ————————
11grac2 exists passed
11grac1 exists passed
Result: Group existence check passed for “oinstall”.
Check: User existence for “nobody”
Node Name Status Comment
———— ———————— ————————
11grac2 exists passed
11grac1 exists passed
Result: User existence check passed for “nobody”.
System requirement failed for ‘crs’
Pre-check for cluster services setup was unsuccessful on all the nodes.
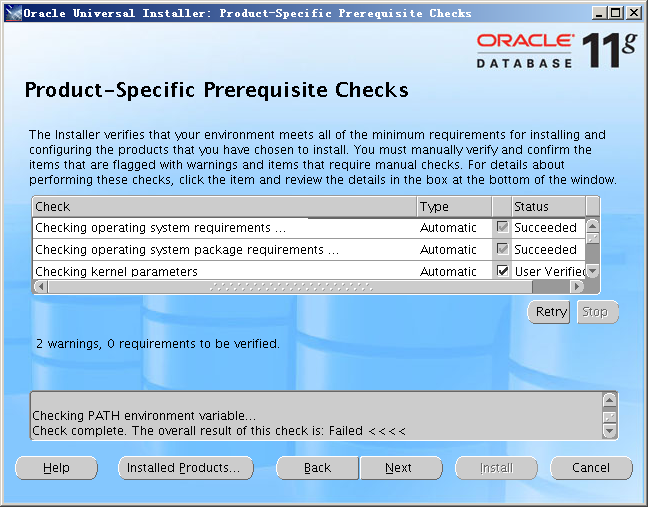
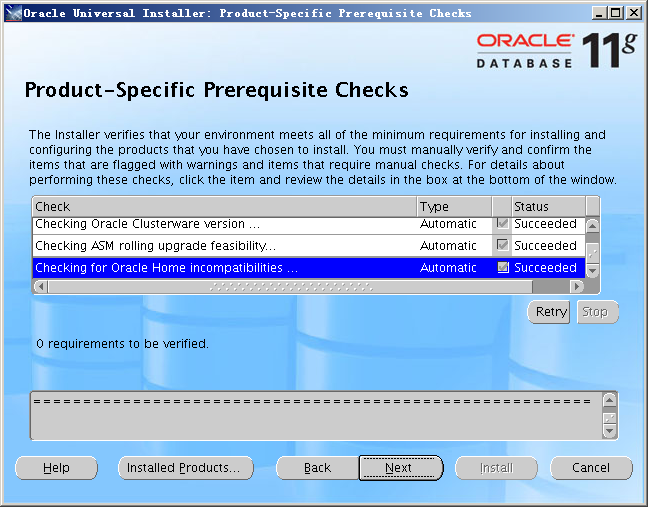
预安装检查完后,如有failed选项,请进行调整后再次检查直至所有选项均为passed即可安装。
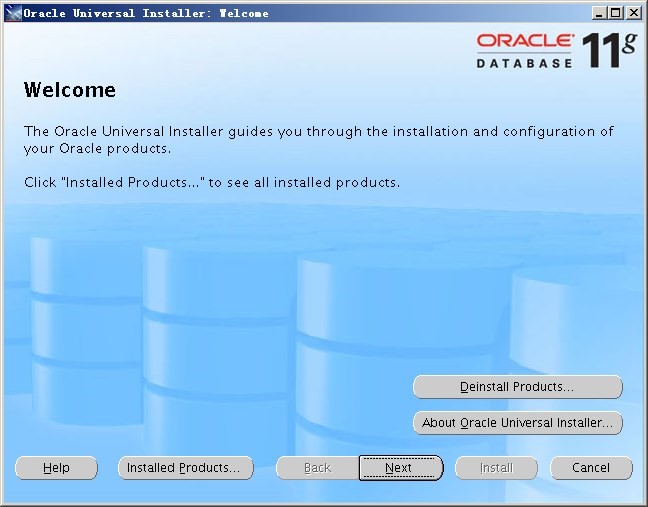
2)开始安装Cluster
[oracle@11grac1.localdomain:/tmp/clusterware]$ export DISPLAY=192.168.56.1:0.0
[oracle@11grac1.localdomain:/tmp/clusterware]$ ./runInstaller
Starting Oracle Universal Installer…
Checking Temp space: must be greater than 120 MB. Actual 18971 MB Passed
Checking swap space: must be greater than 150 MB. Actual 4095 MB Passed
Checking monitor: must be configured to display at least 256 colors. Actual 16777216 Passed
Preparing to launch Oracle Universal Installer from /tmp/OraInstall2015-05-14_10-08-26PM. Please wait …[oracle@11grac1.localdomain:/tmp/clusterware]$ Oracle Universal Installer, Version 11.1.0.6.0 Production
Copyright (C) 1999, 2007, Oracle. All rights reserved.
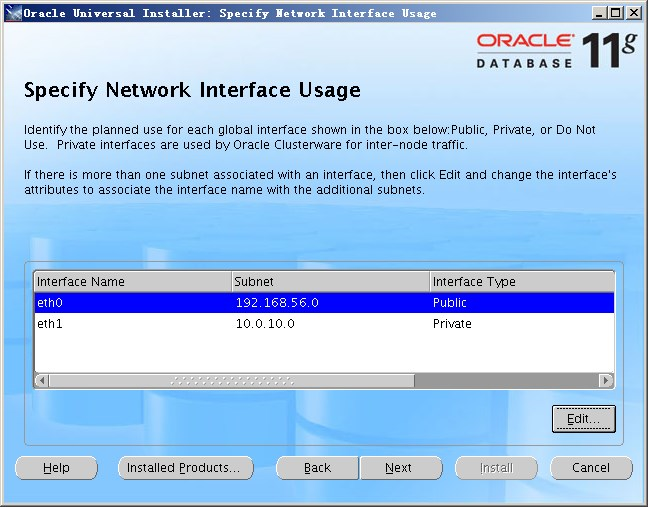
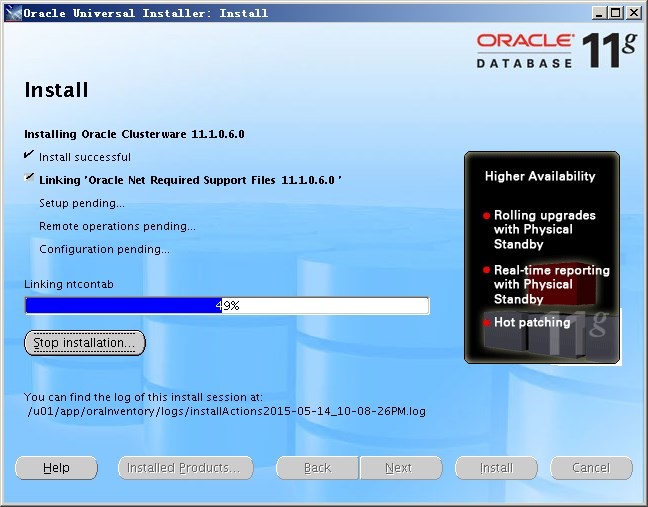
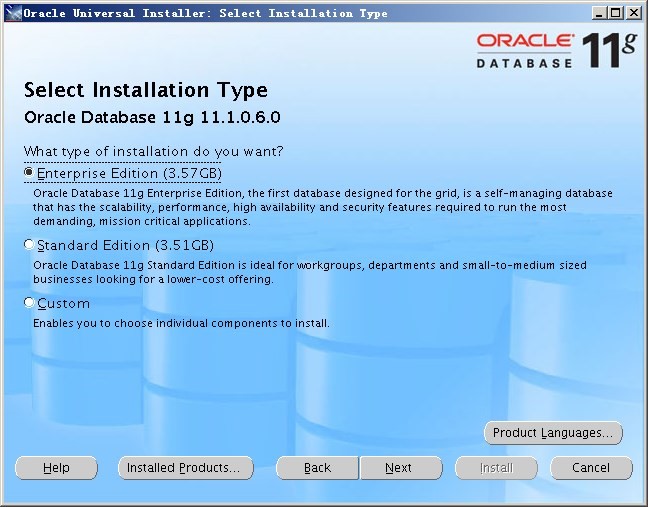
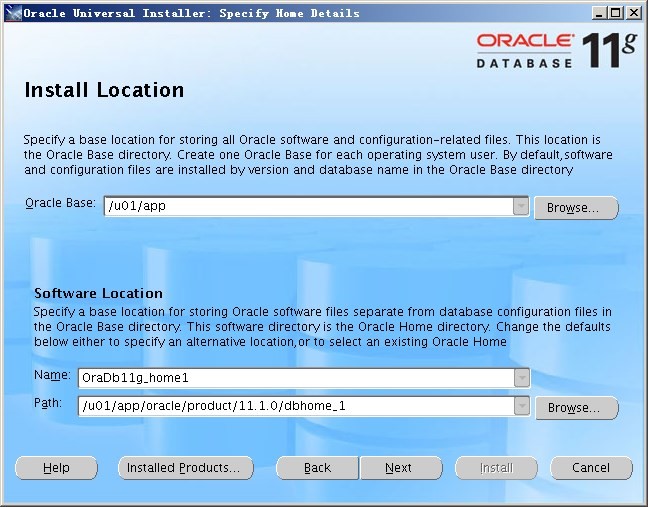
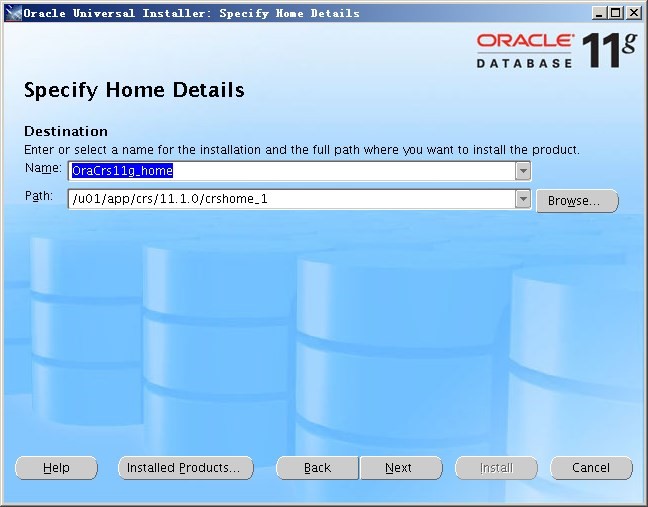
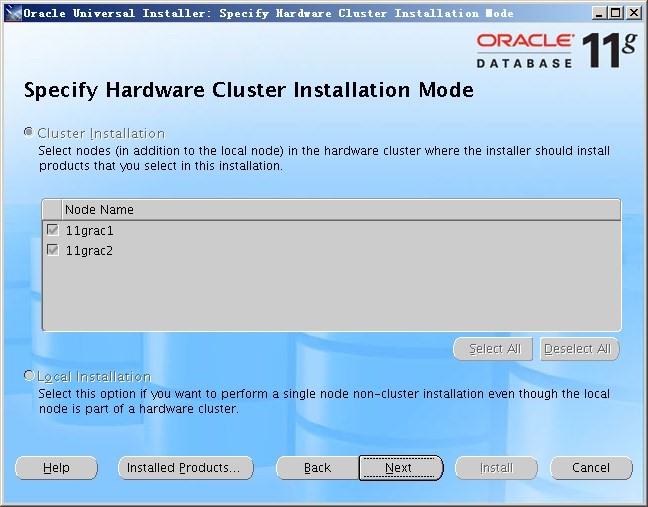
— 请安装如下图示依次操作即可完成Cluster安装


— 指定CRS安装目录
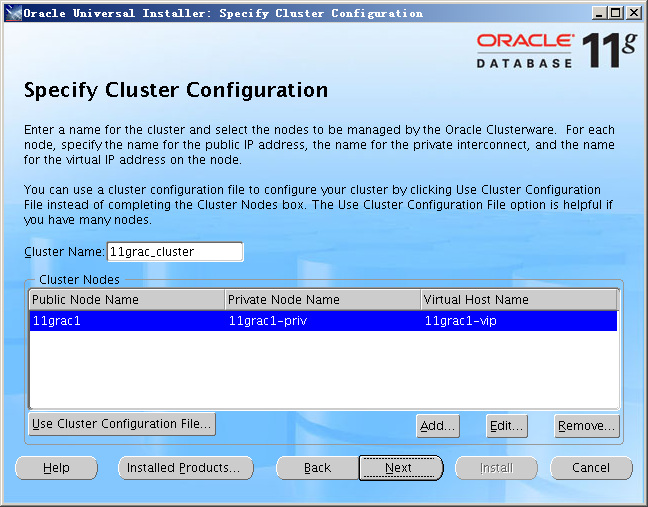
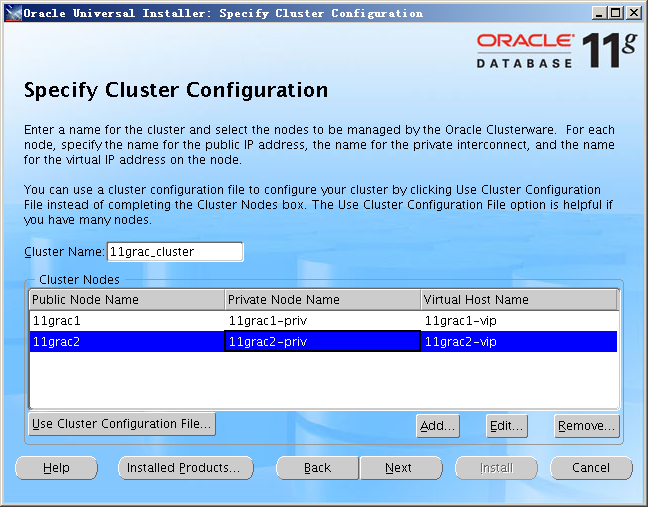
— 添加集群IP信息
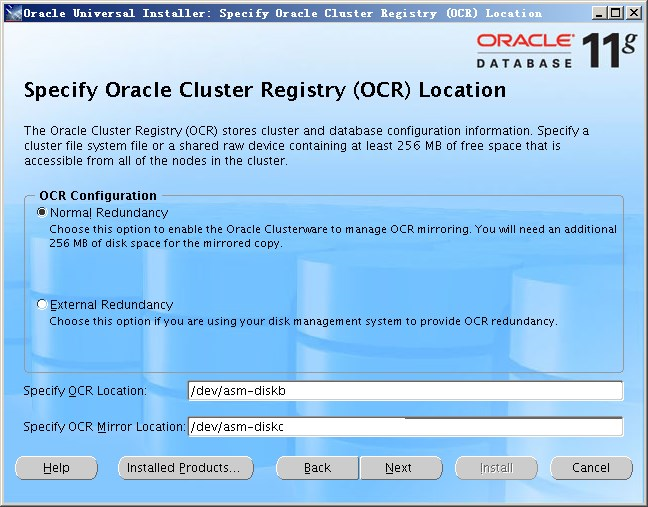
— 指定OCR位置这里使用normal模式 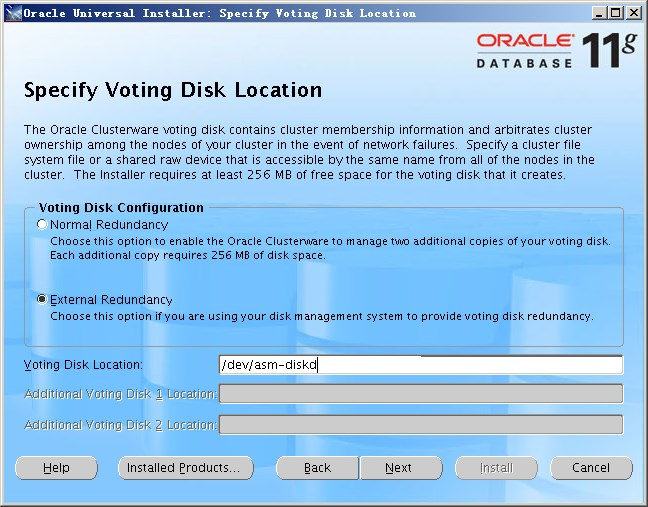
— 指定Voting Disk位置这里使用外部冗余模式 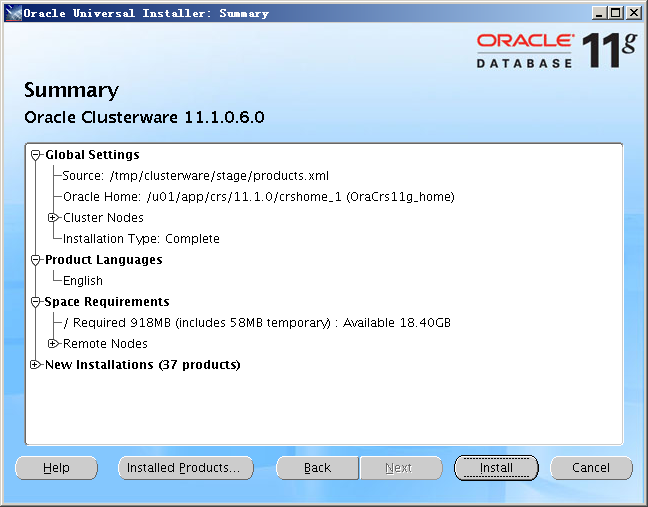

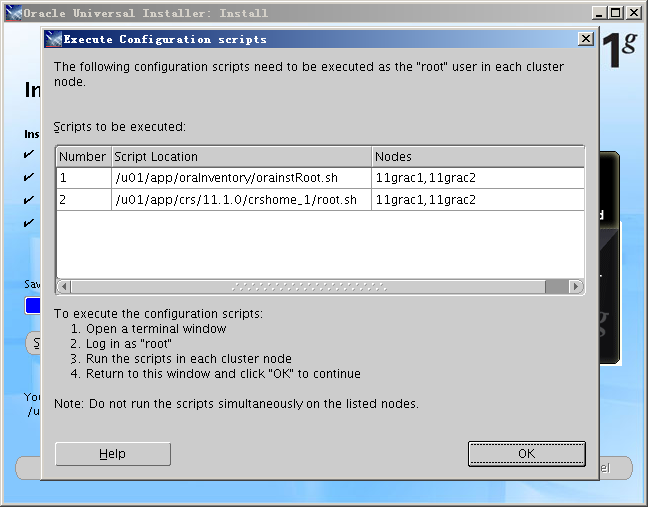
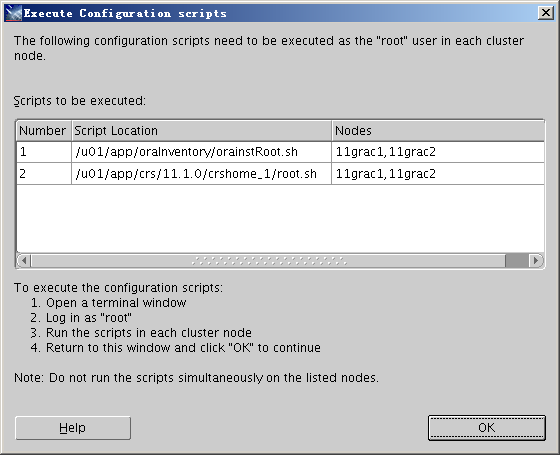
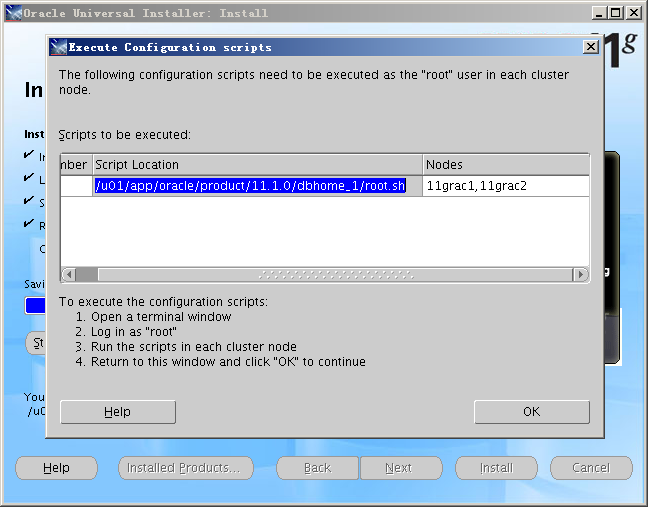
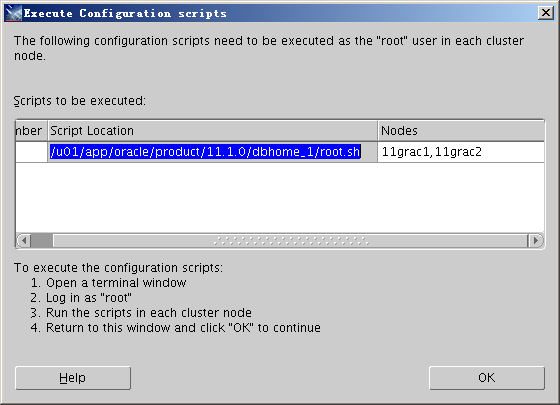
— 安装要求依次按照顺序在每一个节点用root用户执行脚本
[root@11grac1.localdomain:/root]$ /u01/app/oraInventory/orainstRoot.sh
Changing permissions of /u01/app/oraInventory to 770.
Changing groupname of /u01/app/oraInventory to oinstall.
The execution of the script is complete
[root@11grac2.localdomain:/root]$ /u01/app/oraInventory/orainstRoot.sh
Changing permissions of /u01/app/oraInventory to 770.
Changing groupname of /u01/app/oraInventory to oinstall.
The execution of the script is complete
[root@11grac1.localdomain:/root]$ /u01/app/crs/11.1.0/crshome_1/root.sh
WARNING: directory ‘/u01/app/crs/11.1.0′ is not owned by root
WARNING: directory ‘/u01/app/crs’ is not owned by root
WARNING: directory ‘/u01/app’ is not owned by root
WARNING: directory ‘/u01′ is not owned by root
Checking to see if Oracle CRS stack is already configured
/etc/oracle does not exist. Creating it now.
Setting the permissions on OCR backup directory
Setting up Network socket directories
Oracle Cluster Registry configuration upgraded successfully
The directory ‘/u01/app/crs/11.1.0′ is not owned by root. Changing owner to root
The directory ‘/u01/app/crs’ is not owned by root. Changing owner to root
The directory ‘/u01/app’ is not owned by root. Changing owner to root
The directory ‘/u01′ is not owned by root. Changing owner to root
Successfully accumulated necessary OCR keys.
Using ports: CSS=49895 CRS=49896 EVMC=49898 and EVMR=49897.
node <nodenumber>: <nodename> <private interconnect name> <hostname>
node 1: 11grac1 11grac1-priv 11grac1
node 2: 11grac2 11grac2-priv 11grac2
Creating OCR keys for user ‘root’, privgrp ‘root’..
Operation successful.
Now formatting voting device: /dev/asm-diskd
Format of 1 voting devices complete.
Startup will be queued to init within 30 seconds.
Adding daemons to inittab
Expecting the CRS daemons to be up within 600 seconds.
Cluster Synchronization Services is active on these nodes.
11grac1
Cluster Synchronization Services is inactive on these nodes.
11grac2
Local node checking complete. Run root.sh on remaining nodes to start CRS daemons.
[root@11grac2.localdomain:/root]$ /u01/app/crs/11.1.0/crshome_1/root.sh
WARNING: directory ‘/u01/app/crs/11.1.0′ is not owned by root
WARNING: directory ‘/u01/app/crs’ is not owned by root
WARNING: directory ‘/u01/app’ is not owned by root
WARNING: directory ‘/u01′ is not owned by root
Checking to see if Oracle CRS stack is already configured
/etc/oracle does not exist. Creating it now.
Setting the permissions on OCR backup directory
Setting up Network socket directories
Oracle Cluster Registry configuration upgraded successfully
The directory ‘/u01/app/crs/11.1.0′ is not owned by root. Changing owner to root
The directory ‘/u01/app/crs’ is not owned by root. Changing owner to root
The directory ‘/u01/app’ is not owned by root. Changing owner to root
The directory ‘/u01′ is not owned by root. Changing owner to root
clscfg: EXISTING configuration version 4 detected.
clscfg: version 4 is 11 Release 1.
Successfully accumulated necessary OCR keys.
Using ports: CSS=49895 CRS=49896 EVMC=49898 and EVMR=49897.
node <nodenumber>: <nodename> <private interconnect name> <hostname>
node 1: 11grac1 11grac1-priv 11grac1
node 2: 11grac2 11grac2-priv 11grac2
clscfg: Arguments check out successfully.
NO KEYS WERE WRITTEN. Supply -force parameter to override.
-force is destructive and will destroy any previous cluster
configuration.
Oracle Cluster Registry for cluster has already been initialized
Startup will be queued to init within 30 seconds.
Adding daemons to inittab
Expecting the CRS daemons to be up within 600 seconds.
Cluster Synchronization Services is active on these nodes.
11grac1
11grac2
Cluster Synchronization Services is active on all the nodes.
Waiting for the Oracle CRSD and EVMD to start
Waiting for the Oracle CRSD and EVMD to start
Oracle CRS stack installed and running under init(1M)
Running vipca(silent) for configuring nodeapps
Creating VIP application resource on (2) nodes…
Creating GSD application resource on (2) nodes…
Creating ONS application resource on (2) nodes…
Starting VIP application resource on (2) nodes…
Starting GSD application resource on (2) nodes…
Starting ONS application resource on (2) nodes…
Done.
— root脚本运行成功后检查集群状态
[root@11grac1.localdomain:/root]$ crs_stat -t
Name Type Target State Host
————————————————————
ora….ac1.gsd application ONLINE ONLINE 11grac1
ora….ac1.ons application ONLINE ONLINE 11grac1
ora….ac1.vip application ONLINE ONLINE 11grac1
ora….ac2.gsd application ONLINE ONLINE 11grac2
ora….ac2.ons application ONLINE ONLINE 11grac2
ora….ac2.vip application ONLINE ONLINE 11grac2
[root@11grac2.localdomain:/root]$ crs_stat -t
Name Type Target State Host
————————————————————
ora….ac1.gsd application ONLINE ONLINE 11grac1
ora….ac1.ons application ONLINE ONLINE 11grac1
ora….ac1.vip application ONLINE ONLINE 11grac1
ora….ac2.gsd application ONLINE ONLINE 11grac2
ora….ac2.ons application ONLINE ONLINE 11grac2
ora….ac2.vip application ONLINE ONLINE 11grac2
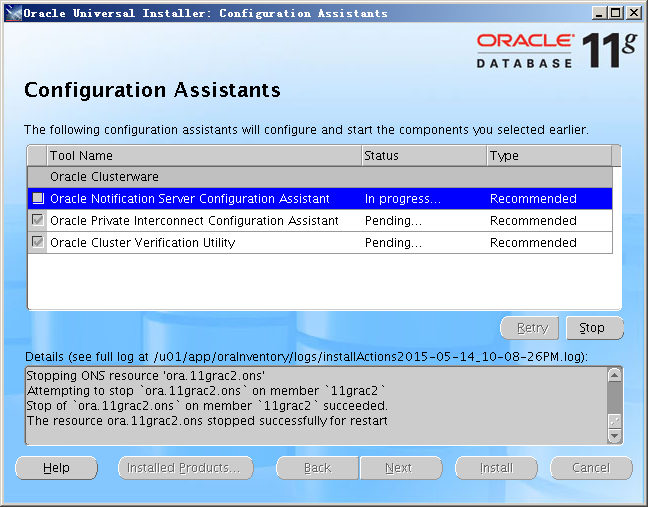
— root脚本运行成功后点击“OK”后进行集群的最后配置
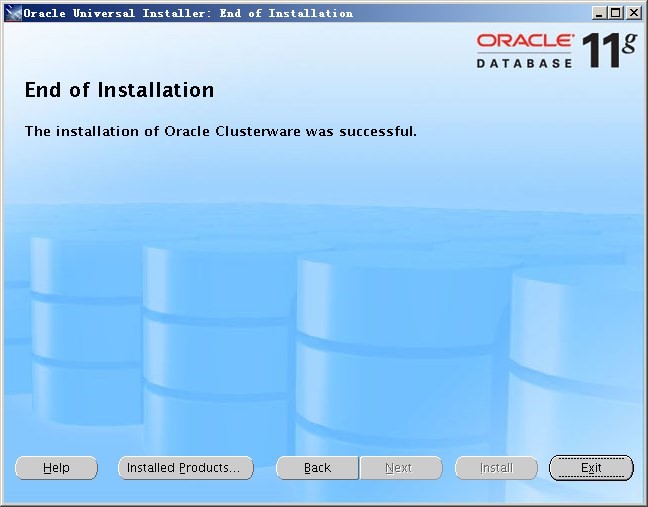
— 到此集群软件安装成功
十一、安装11.1.0.6 Database软件
[root@11grac1.localdomain:/tmp]$ unzip linux.x64_11gR1_database.zip
[root@11grac1.localdomain:/tmp]$ cd database
[oracle@11grac1.localdomain:/tmp/database]$ ./runInstaller
Starting Oracle Universal Installer…
Checking Temp space: must be greater than 120 MB. Actual 16606 MB Passed
Checking swap space: must be greater than 150 MB. Actual 4095 MB Passed
Checking monitor: must be configured to display at least 256 colors. Actual 16777216 Passed
Preparing to launch Oracle Universal Installer from /tmp/OraInstall2015-05-14_10-49-31PM. Please wait …[oracle@11grac1.localdomain:/tmp/database]$ Oracle Universal Installer, Version 11.1.0.6.0 Production
Copyright (C) 1999, 2007, Oracle. All rights reserved.
— 请安装如下图示依次操作即可完成Database安装
— 指定Database的安装位置
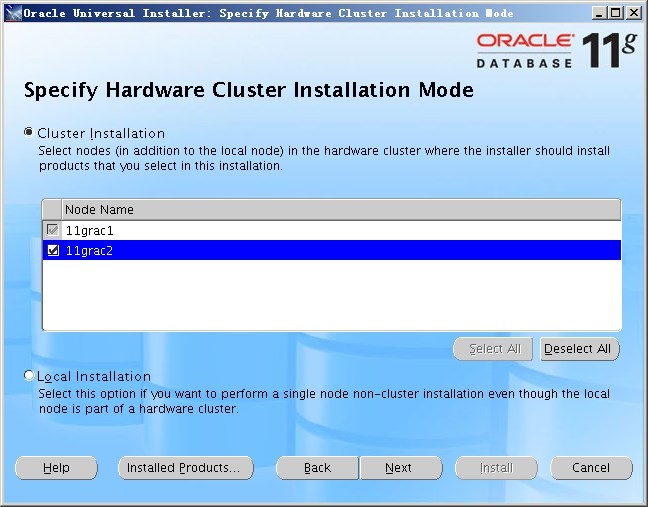
— 选择集群安装模式
[root@11grac1.localdomain:/root]$ /u01/app/oracle/product/11.1.0/dbhome_1/root.sh
Running Oracle 11g root.sh script…
The following environment variables are set as:
ORACLE_OWNER= oracle
ORACLE_HOME= /u01/app/oracle/product/11.1.0/dbhome_1
Enter the full pathname of the local bin directory: [/usr/local/bin]:
The file “dbhome” already exists in /usr/local/bin. Overwrite it? (y/n)
[n]: y
Copying dbhome to /usr/local/bin …
The file “oraenv” already exists in /usr/local/bin. Overwrite it? (y/n)
[n]: y
Copying oraenv to /usr/local/bin …
The file “coraenv” already exists in /usr/local/bin. Overwrite it? (y/n)
[n]: y
Copying coraenv to /usr/local/bin …
Creating /etc/oratab file…
Entries will be added to the /etc/oratab file as needed by
Database Configuration Assistant when a database is created
Finished running generic part of root.sh script.
Now product-specific root actions will be performed.
Finished product-specific root actions.
[root@11grac2.localdomain:/root]$ /u01/app/oracle/product/11.1.0/dbhome_1/root.sh
Running Oracle 11g root.sh script…
The following environment variables are set as:
ORACLE_OWNER= oracle
ORACLE_HOME= /u01/app/oracle/product/11.1.0/dbhome_1
Enter the full pathname of the local bin directory: [/usr/local/bin]:
Creating y directory…
Copying dbhome to y …
Copying oraenv to y …
Copying coraenv to y …
Creating /etc/oratab file…
Entries will be added to the /etc/oratab file as needed by
Database Configuration Assistant when a database is created
Finished running generic part of root.sh script.
Now product-specific root actions will be performed.
Finished product-specific root actions.

— 到此Database安装完成
十二、升级11.1.0.6 RAC到11.1.0.7
根据readme文档说明,这里我们选择Non Rolling Upgrade方式进行升级,先升级Cluster软件,再升级Database软件。
1)关闭集群(两个节点操作)
$ emctl stop dbconsole
$ srvctl stop database -d db_name
$ srvctl stop asm -n node
$ srvctl stop nodeapps -n node
— 由于我们这里只安装了集群和数据库软件没有创建数据库,因此以上步骤可以不用执行。
[root@11grac1 ~]# CRS_HOME/bin/crsctl stop crs
[root@11grac2 ~]# CRS_HOME/bin/crsctl stop crs
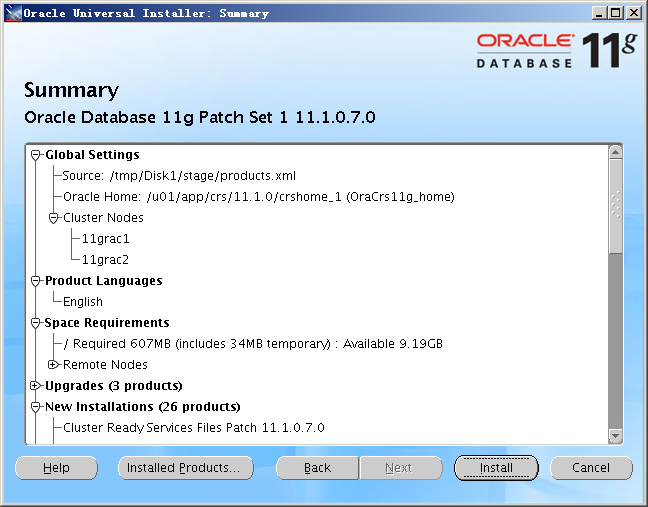
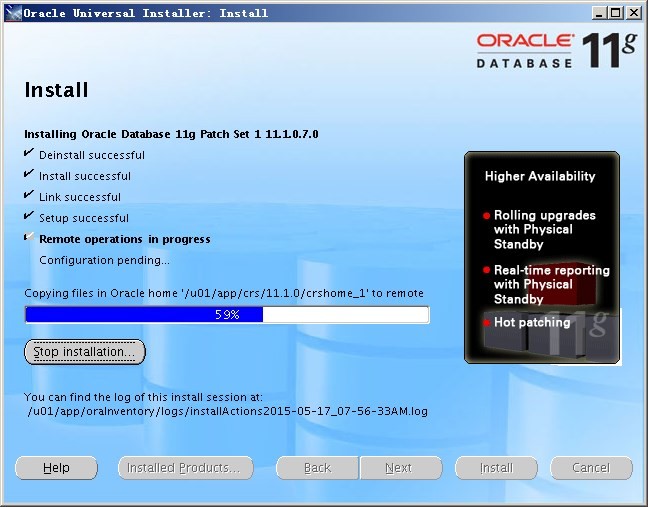
2)升级Cluster软件到11.1.0.7
[root@11grac1.localdomain:/tmp]$ unzip p6890831_111070_Linux-x86-64.zip
[root@11grac1.localdomain:/tmp]$ cd Disk1
[root@11grac1.localdomain:/tmp/Disk1]$ ./runInstaller

— 选择Cluster软件安装目录

— 按照提示依次在两个节点使用root用户执行以上命令脚本
[root@11grac1.localdomain:/root]$ /u01/app/crs/11.1.0/crshome_1/bin/crsctl stop crs
Stopping resources.
This could take several minutes.
Error while stopping resources. Possible cause: CRSD is down.
Stopping Cluster Synchronization Services.
Unable to communicate with the Cluster Synchronization Services daemon.
[root@11grac1.localdomain:/root]$ /u01/app/crs/11.1.0/crshome_1/install/root111.sh
Creating pre-patch directory for saving pre-patch clusterware files
Completed patching clusterware files to /u01/app/crs/11.1.0/crshome_1
Relinking some shared libraries.
Relinking of patched files is complete.
Preparing to recopy patched init and RC scripts.
Recopying init and RC scripts.
Startup will be queued to init within 30 seconds.
Starting up the CRS daemons.
Waiting for the patched CRS daemons to start.
This may take a while on some systems.
.
.
.
.
.
.
.
11107 patch successfully applied.
clscfg: EXISTING configuration version 4 detected.
clscfg: version 4 is 11 Release 1.
Successfully accumulated necessary OCR keys.
Using ports: CSS=49895 CRS=49896 EVMC=49898 and EVMR=49897.
node <nodenumber>: <nodename> <private interconnect name> <hostname>
node 1: 11grac1 11grac1-priv 11grac1
Creating OCR keys for user ‘root’, privgrp ‘root’..
Operation successful.
clscfg -upgrade completed successfully
Creating ‘/u01/app/crs/11.1.0/crshome_1/install/paramfile.crs’ with data used for CRS configuration
Setting CRS configuration values in /u01/app/crs/11.1.0/crshome_1/install/paramfile.crs
Setting cluster unique identifier
Restarting Oracle clusterware
Stopping Oracle clusterware
Stopping resources.
This could take several minutes.
Successfully stopped Oracle Clusterware resources
Stopping Cluster Synchronization Services.
Shutting down the Cluster Synchronization Services daemon.
Shutdown request successfully issued.
Waiting for Cluster Synchronization Services daemon to stop
Waiting for Cluster Synchronization Services daemon to stop
Cluster Synchronization Services daemon has stopped
Starting Oracle clusterware
Attempting to start Oracle Clusterware stack
Waiting for Cluster Synchronization Services daemon to start
Waiting for Cluster Synchronization Services daemon to start
Waiting for Cluster Synchronization Services daemon to start
Waiting for Cluster Synchronization Services daemon to start
Waiting for Cluster Synchronization Services daemon to start
Waiting for Cluster Synchronization Services daemon to start
Waiting for Cluster Synchronization Services daemon to start
Cluster Synchronization Services daemon has started
Waiting for Event Manager daemon to start
Event Manager daemon has started
Cluster Ready Services daemon has started
[root@11grac2.localdomain:/root]$ /u01/app/crs/11.1.0/crshome_1/bin/crsctl stop crs
Stopping resources.
This could take several minutes.
Error while stopping resources. Possible cause: CRSD is down.
Stopping Cluster Synchronization Services.
Unable to communicate with the Cluster Synchronization Services daemon.
[root@11grac2.localdomain:/root]$ /u01/app/crs/11.1.0/crshome_1/install/root111.sh
Creating pre-patch directory for saving pre-patch clusterware files
Completed patching clusterware files to /u01/app/crs/11.1.0/crshome_1
Relinking some shared libraries.
Relinking of patched files is complete.
Preparing to recopy patched init and RC scripts.
Recopying init and RC scripts.
Startup will be queued to init within 30 seconds.
Starting up the CRS daemons.
Waiting for the patched CRS daemons to start.
This may take a while on some systems.
.
11107 patch successfully applied.
clscfg: EXISTING configuration version 4 detected.
clscfg: version 4 is 11 Release 1.
Successfully accumulated necessary OCR keys.
Using ports: CSS=49895 CRS=49896 EVMC=49898 and EVMR=49897.
node <nodenumber>: <nodename> <private interconnect name> <hostname>
node 2: 11grac2 11grac2-priv 11grac2
Creating OCR keys for user ‘root’, privgrp ‘root’..
Operation successful.
clscfg -upgrade completed successfully
Creating ‘/u01/app/crs/11.1.0/crshome_1/install/paramfile.crs’ with data used for CRS configuration
Setting CRS configuration values in /u01/app/crs/11.1.0/crshome_1/install/paramfile.crs
— 执行完成后查看集群资源状态
[root@11grac1.localdomain:/root]$ crs_stat -t
Name Type Target State Host
————————————————————
ora….ac1.gsd application ONLINE ONLINE 11grac1
ora….ac1.ons application ONLINE ONLINE 11grac1
ora….ac1.vip application ONLINE ONLINE 11grac1
ora….ac2.gsd application ONLINE ONLINE 11grac2
ora….ac2.ons application ONLINE ONLINE 11grac2
ora….ac2.vip application ONLINE ONLINE 11grac2
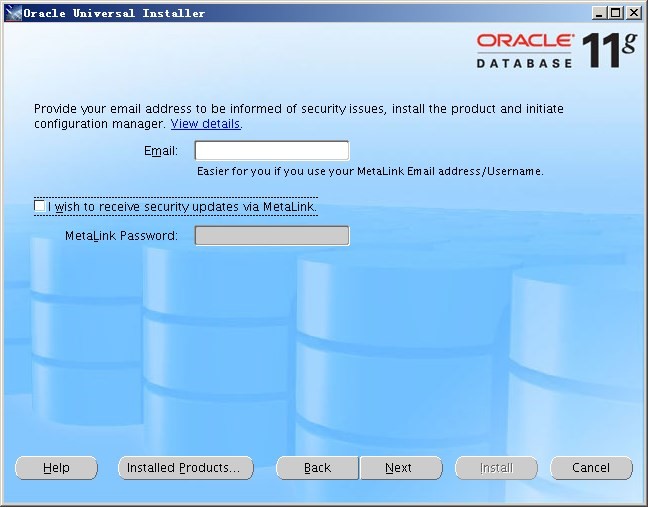
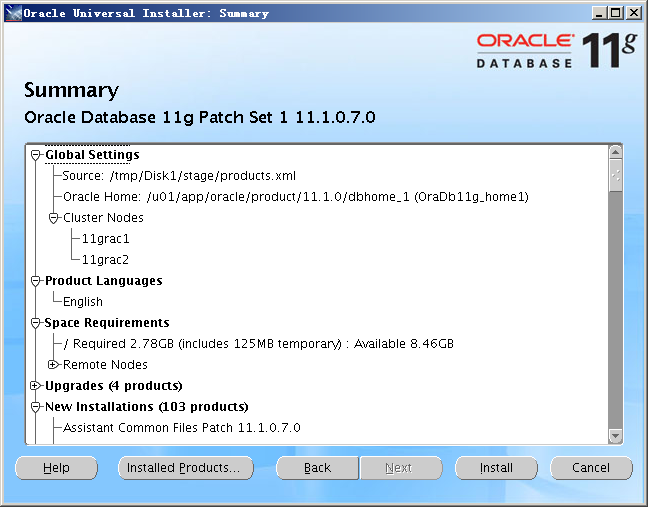
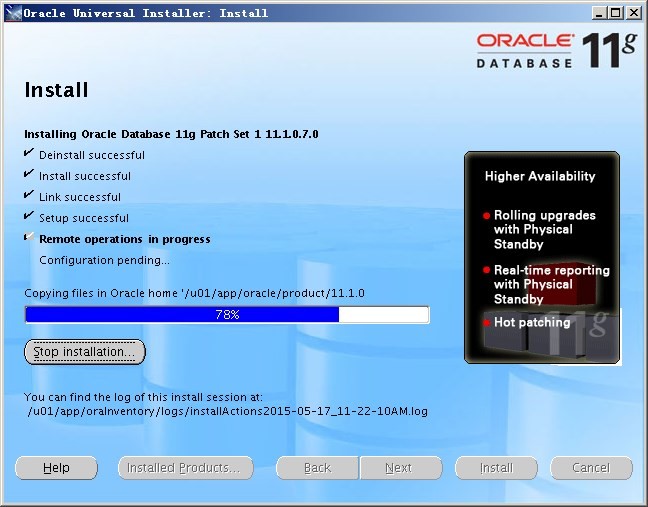
2)升级Database软件到11.1.0.7
[oracle@11grac1.localdomain:/tmp/Disk1]$ ./runInstaller

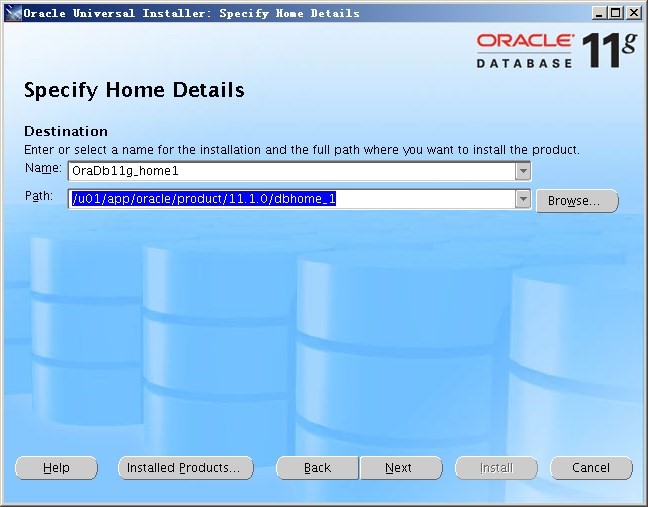
— 选择Database软件安装目录


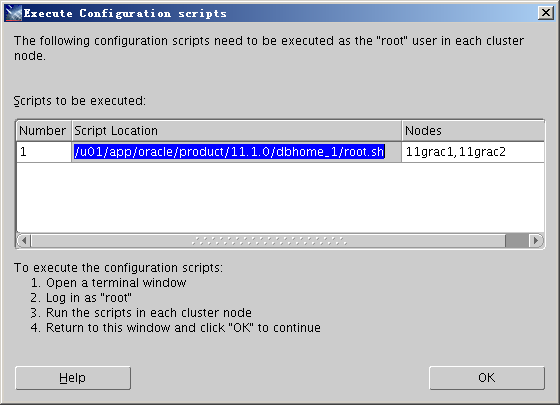
root@11grac1.localdomain:/root]$ /u01/app/oracle/product/11.1.0/dbhome_1/root.sh
Running Oracle 11g root.sh script…
The following environment variables are set as:
ORACLE_OWNER= oracle
ORACLE_HOME= /u01/app/oracle/product/11.1.0/dbhome_1
Enter the full pathname of the local bin directory: [/usr/local/bin]:
The file “dbhome” already exists in /usr/local/bin. Overwrite it? (y/n)
[n]: y
Copying dbhome to /usr/local/bin …
The file “oraenv” already exists in /usr/local/bin. Overwrite it? (y/n)
[n]: y
Copying oraenv to /usr/local/bin …
The file “coraenv” already exists in /usr/local/bin. Overwrite it? (y/n)
[n]: y
Copying coraenv to /usr/local/bin …
Entries will be added to the /etc/oratab file as needed by
Database Configuration Assistant when a database is created
Finished running generic part of root.sh script.
Now product-specific root actions will be performed.
Finished product-specific root actions.
[root@11grac2.localdomain:/root]$ /u01/app/oracle/product/11.1.0/dbhome_1/root.sh
Running Oracle 11g root.sh script…
The following environment variables are set as:
ORACLE_OWNER= oracle
ORACLE_HOME= /u01/app/oracle/product/11.1.0/dbhome_1
Enter the full pathname of the local bin directory: [/usr/local/bin]:
The file “dbhome” already exists in /usr/local/bin. Overwrite it? (y/n)
[n]: y
Copying dbhome to /usr/local/bin …
The file “oraenv” already exists in /usr/local/bin. Overwrite it? (y/n)
[n]: y
Copying oraenv to /usr/local/bin …
The file “coraenv” already exists in /usr/local/bin. Overwrite it? (y/n)
[n]: y
Copying coraenv to /usr/local/bin …
Entries will be added to the /etc/oratab file as needed by
Database Configuration Assistant when a database is created
Finished running generic part of root.sh script.
Now product-specific root actions will be performed.
Finished product-specific root actions.

— 到此集群数据库升级至11.1.0.7完成
4)检查集群数据库软件版本
oracle@11grac1.localdomain:/u01/app/crs/11.1.0/crshome_1/OPatch]$ ./opatch lsinventory
Invoking OPatch 11.1.0.6.2
Oracle Interim Patch Installer version 11.1.0.6.2
Copyright (c) 2007, Oracle Corporation. All rights reserved.
Oracle Home : /u01/app/oracle/product/11.1.0/dbhome_1
Central Inventory : /u01/app/oraInventory
from : /etc/oraInst.loc
OPatch version : 11.1.0.6.2
OUI version : 11.1.0.7.0
OUI location : /u01/app/oracle/product/11.1.0/dbhome_1/oui
Log file location : /u01/app/oracle/product/11.1.0/dbhome_1/cfgtoollogs/opatch/opatch2015-05-17_12-00-52PM.log
Lsinventory Output file location : /u01/app/oracle/product/11.1.0/dbhome_1/cfgtoollogs/opatch/lsinv/lsinventory2015-05-17_12-00-52PM.txt
——————————————————————————–
Installed Top-level Products (2):
Oracle Database 11g 11.1.0.6.0
Oracle Database 11g Patch Set 1 11.1.0.7.0
There are 2 products installed in this Oracle Home.
There are no Interim patches installed in this Oracle Home.
Rac system comprising of multiple nodes
Local node = 11grac1
Remote node = 11grac2
——————————————————————————–
OPatch succeeded.
[oracle@11grac1.localdomain:/u01/app/oracle/product/11.1.0/dbhome_1/OPatch]$ ./opatch lsinventory
‘Invoking OPatch 11.1.0.6.2
Oracle Interim Patch Installer version 11.1.0.6.2
Copyright (c) 2007, Oracle Corporation. All rights reserved.
Oracle Home : /u01/app/oracle/product/11.1.0/dbhome_1
Central Inventory : /u01/app/oraInventory
from : /etc/oraInst.loc
OPatch version : 11.1.0.6.2
OUI version : 11.1.0.7.0
OUI location : /u01/app/oracle/product/11.1.0/dbhome_1/oui
Log file location : /u01/app/oracle/product/11.1.0/dbhome_1/cfgtoollogs/opatch/opatch2015-05-17_11-59-28AM.log
Lsinventory Output file location : /u01/app/oracle/product/11.1.0/dbhome_1/cfgtoollogs/opatch/lsinv/lsinventory2015-05-17_11-59-28AM.txt
——————————————————————————–
Installed Top-level Products (2):
Oracle Database 11g 11.1.0.6.0
Oracle Database 11g Patch Set 1 11.1.0.7.0
There are 2 products installed in this Oracle Home.
There are no Interim patches installed in this Oracle Home.
Rac system comprising of multiple nodes
Local node = 11grac1
Remote node = 11grac2
——————————————————————————–
OPatch succeeded.
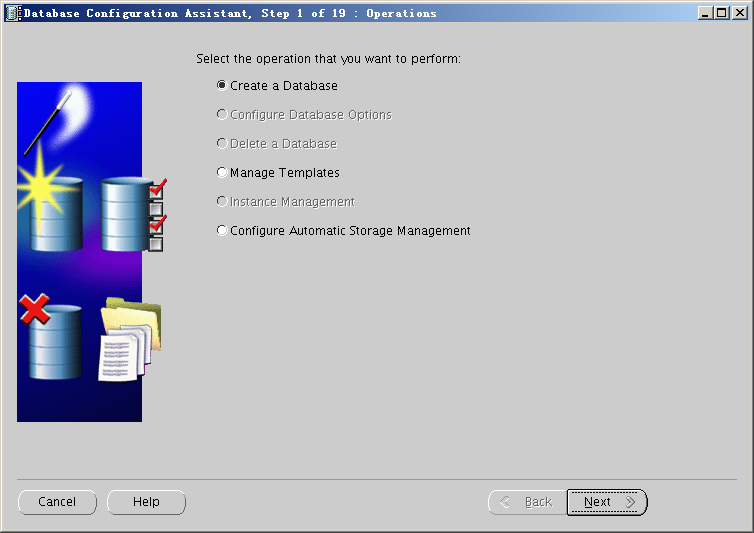
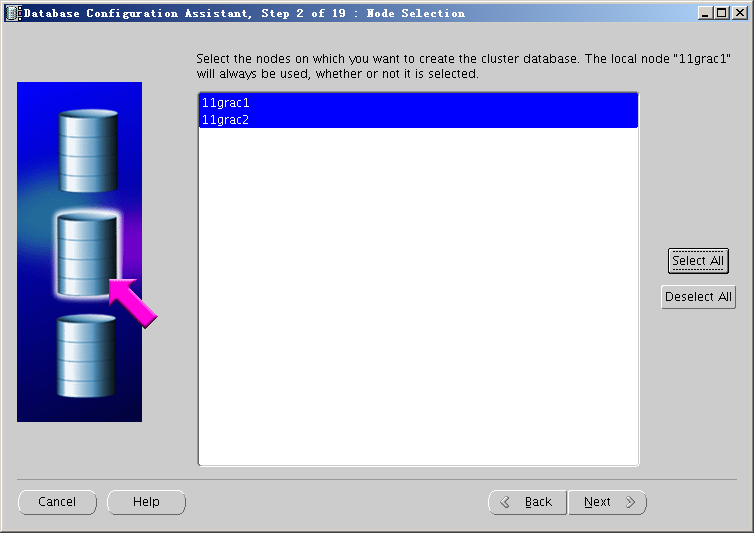
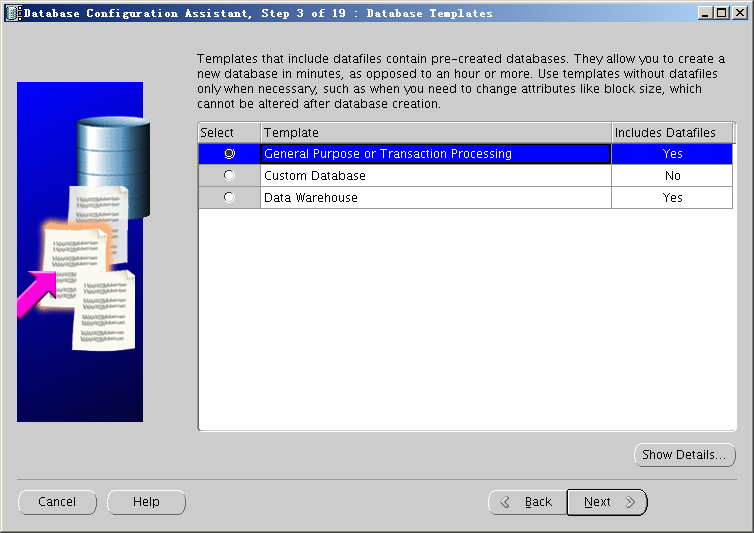
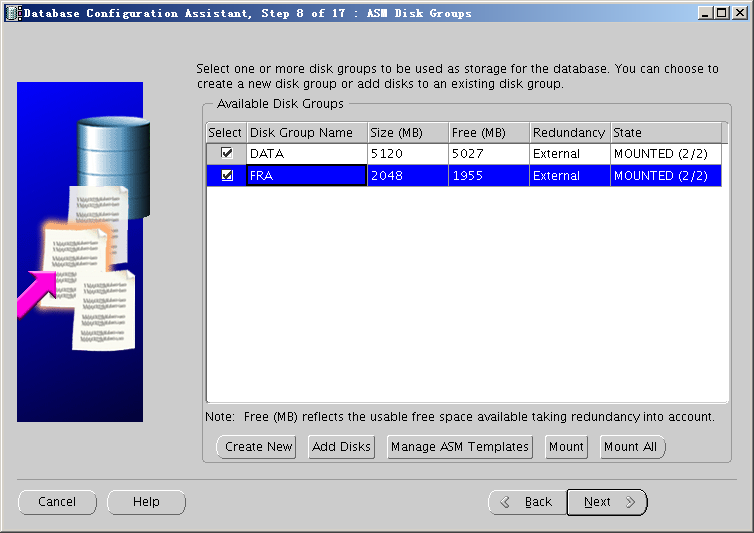
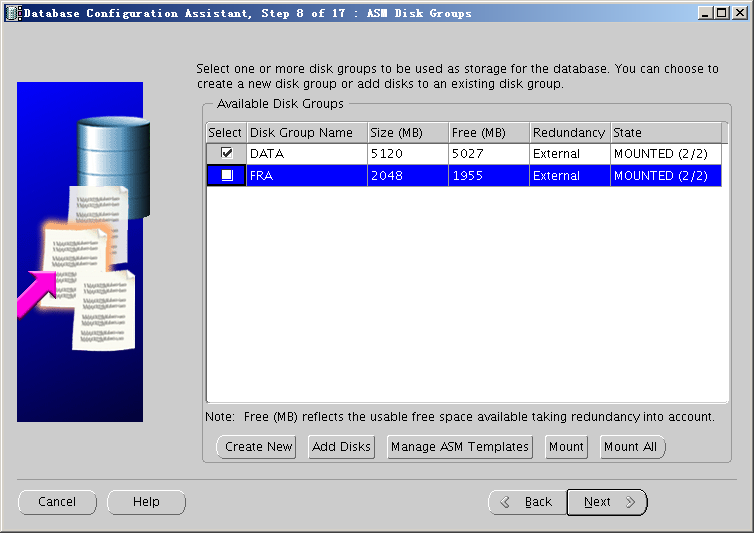
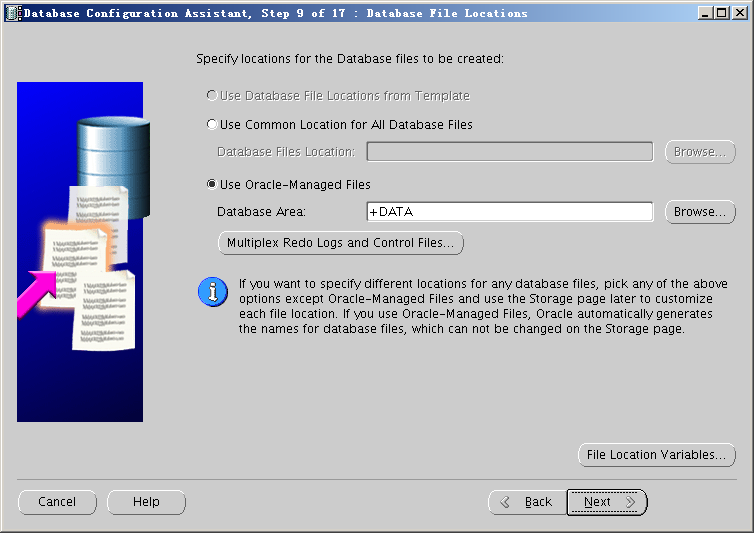
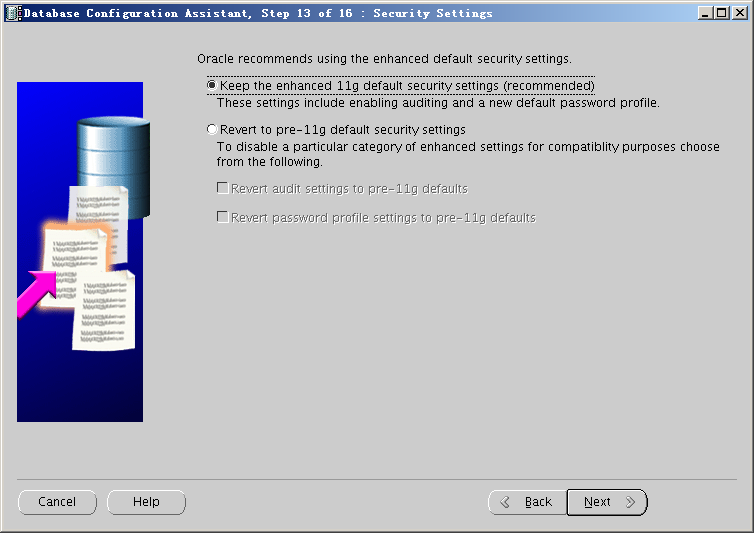
十三、创建数据库
1)dbca创建数据库
[oracle@11grac1 ~]$ dbca


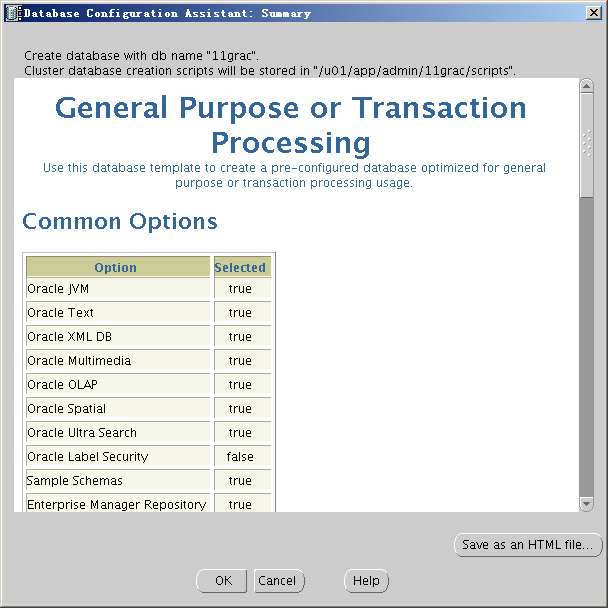
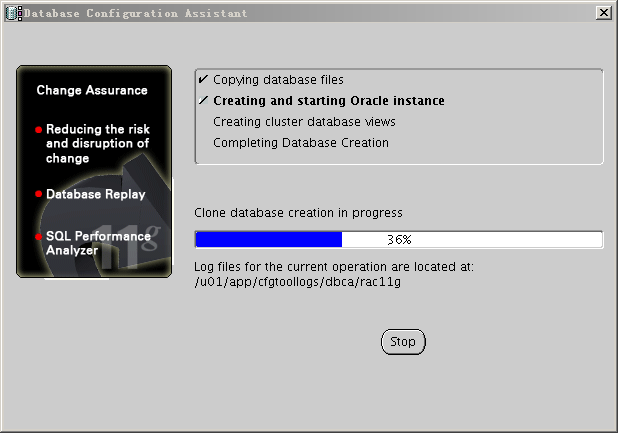
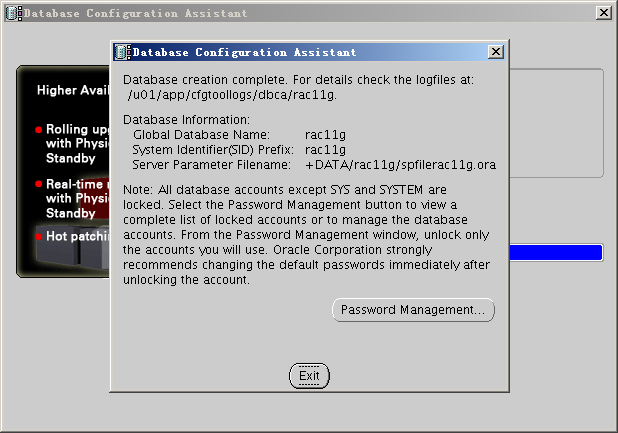
— 至此数据库创建成功
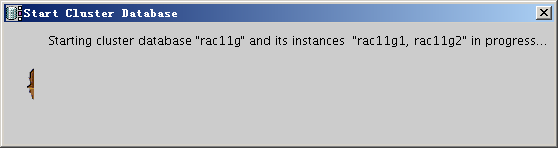
2)查看集群及数据库状态
[oracle@11grac1.localdomain:/home/oracle]$ crs_stat -t
Name Type Target State Host
————————————————————
ora….SM1.asm application ONLINE ONLINE 11grac1
ora….C1.lsnr application ONLINE ONLINE 11grac1
ora….ac1.gsd application ONLINE ONLINE 11grac1
ora….ac1.ons application ONLINE ONLINE 11grac1
ora….ac1.vip application ONLINE ONLINE 11grac1
ora….SM2.asm application ONLINE ONLINE 11grac2
ora….C2.lsnr application ONLINE ONLINE 11grac2
ora….ac2.gsd application ONLINE ONLINE 11grac2
ora….ac2.ons application ONLINE ONLINE 11grac2
ora….ac2.vip application ONLINE ONLINE 11grac2
ora.rac11g.db application ONLINE ONLINE 11grac2
ora….g1.inst application ONLINE ONLINE 11grac1
ora….g2.inst application ONLINE ONLINE 11grac2
SQL> select instance_name,status from gv$instance;
INSTANCE_NAME STATUS
—————- ————
rac11g1 OPEN
rac11g2 OPEN
十四、总结
以上我们用比较详细的步骤演示了在安装11.1.0.6 RAC并升级至11.1.0.7的整个过程,后续章节将演示如何将11.1.0.7 RAC升级到11gR2的最新版本,敬请关注。
搜索
复制